Esri’s ArcGIS® Field Maps is a mobile app designed for phones and tablets that streamlines field data collection directly into ArcGIS. Mobile field staff can use Field Maps for a variety of tasks such as collecting new GIS data, updating existing information from the field, exploring their current maps to make better decisions in the field and office, and sharing secured map views with colleagues and other stakeholders.
This article is intended for beginners using Field Maps for the first time to collect assets with high-accuracy locations. In this article, we will show you how to create a new feature layer in ArcGIS Online, review the GNSS attribute fields in the layer you just created, and create a web map that uses your new feature layer during field data collection in Field Maps.
Let’s get started …
On This Page: Table of Contents
Creating Your New Feature Layer
First, you will need to create your web map in ArcGIS Online.
1. Sign in to your ArcGIS Online account.
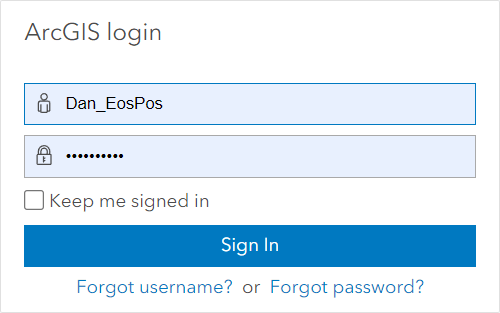
2. ArcGIS Online will take you to your organization’s home page. From here, select “Content” in the main navigation tab. Then select “My Content” from the sub-menu that appears. This will take you to the most recently used project folder in your organization. Any existing content to which you have access, including items such as web maps, web scenes, and feature layers, will be shown in this folder. In our example screenshot below, the most recently used project folder, “Asset Inspections,” contains a web map item called “Tangible Asset Inventory-GASB34.”
TIP: To create a new folder for your project select the “Create new folder icon” which looks like this:

3. Next, you will create a new item. The type of item you want to create is an editable feature layer with predefined fields. To do this you will use one of the Esri curated templates that are available in ArcGIS Online. Select “New item” to access the different options for creating a new feature layer.

4. Since you are starting from scratch and need to collect assets for the first time, select the “Feature layer” option. This will create an empty feature layer to store all your new assets that you will collect.
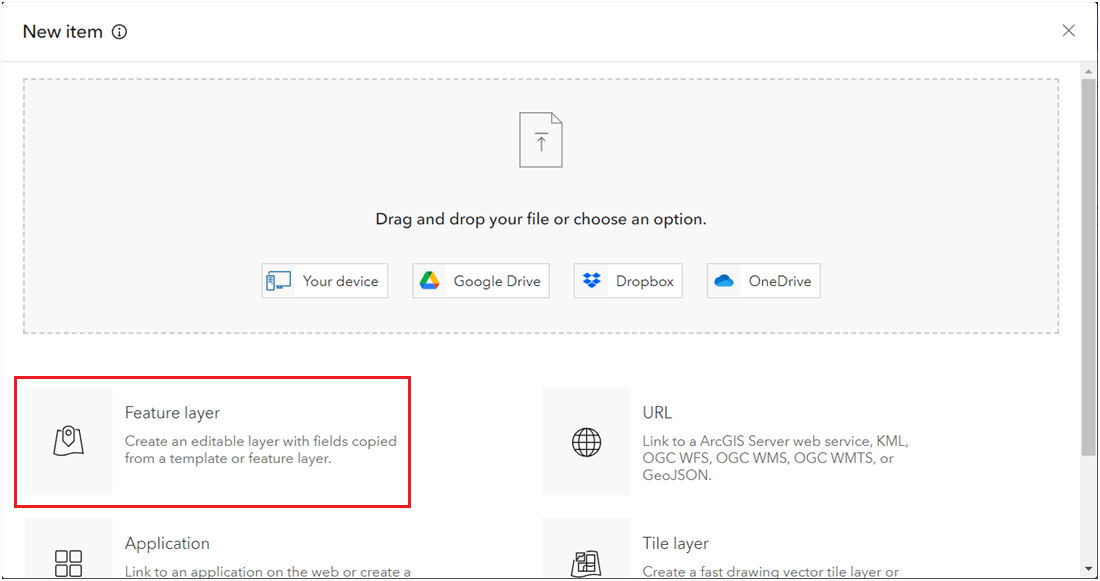
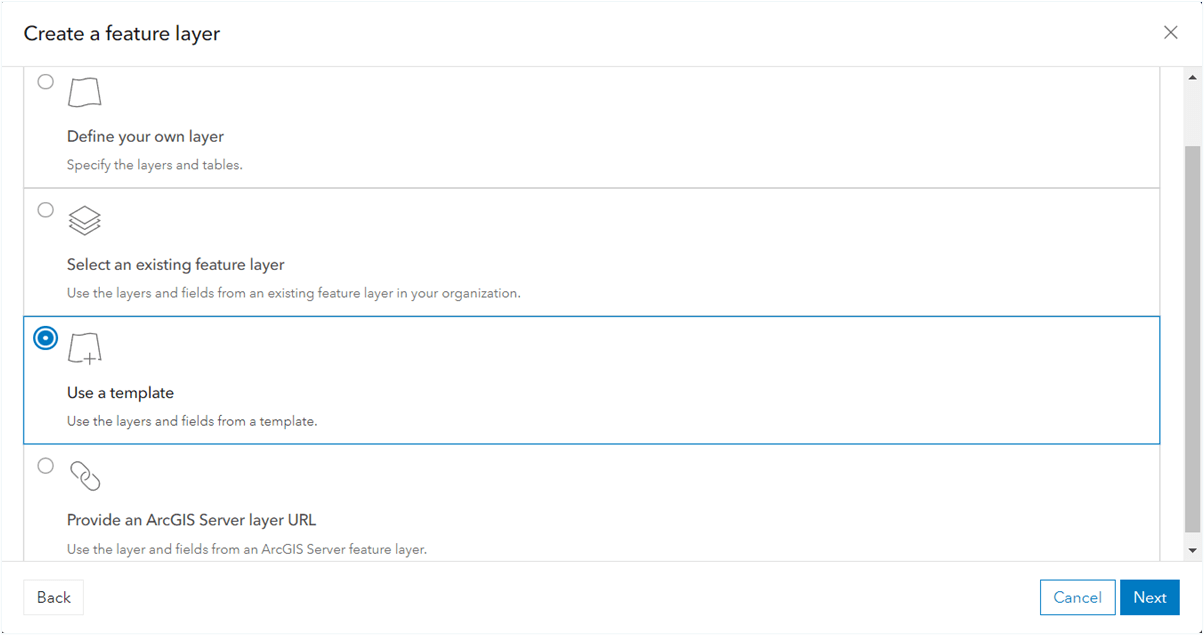
ArcGIS Online will now give you four options to create your new feature layer:
- Define your own layer
- Select an existing feature layer
- Use a template
- Use a layer from ArcGIS Server
5. Select the “Use a template” option. This will allow you to access the list of templates within ArcGIS Online that already contain predefined industry-specific layers and attribute fields. This will be helpful moving forward, so you don’t need to define all of these manually for your map.
Next you will choose your ArcGIS Online feature layer template. You can filter the available templates in ArcGIS Online by industry type (e.g., electric utilities, forestry, transportation) or you can enter a search term to find templates that are relevant to your project requirements.
6. In this example, we are going to use Esri’s “Proposed Water Design” feature layer template. To find this template, you can either type into the search bar “Water Design,” or you can filter by the “Water Utilities” industry on the left. We are choosing the “Proposed Water Design” template because it includes predefined attribute fields that support high-accuracy GNSS locations and metadata from an Eos GNSS receiver.
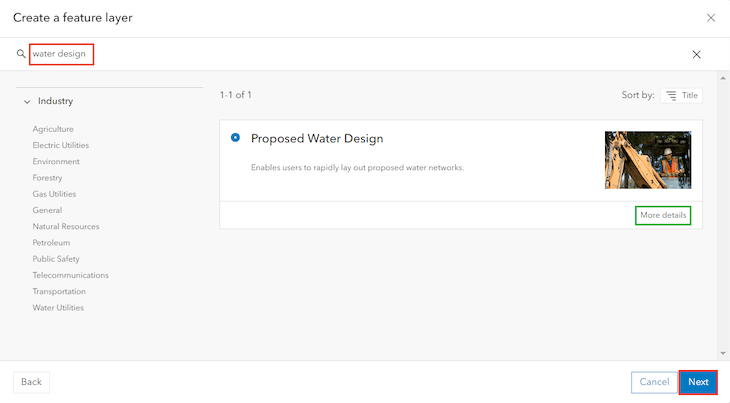
TIP: To determine if a template is suitable for your application, click the “More details” button to see the layers, fields, and tables contained in each template. Doing this will let you see if GNSS attributes are preconfigured in a template and choose templates that include these values when high-accuracy data collection is required or desired.
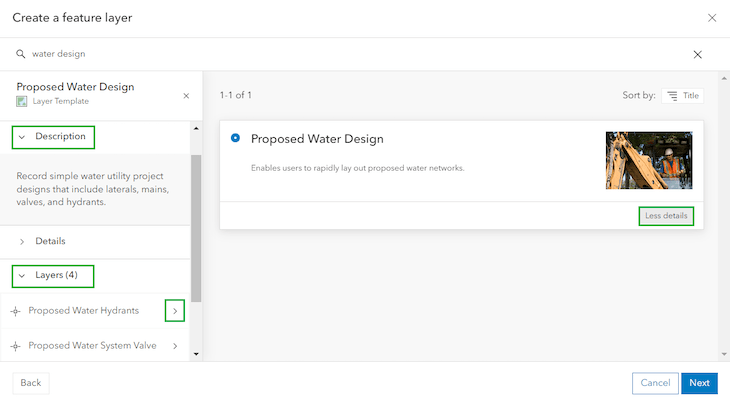
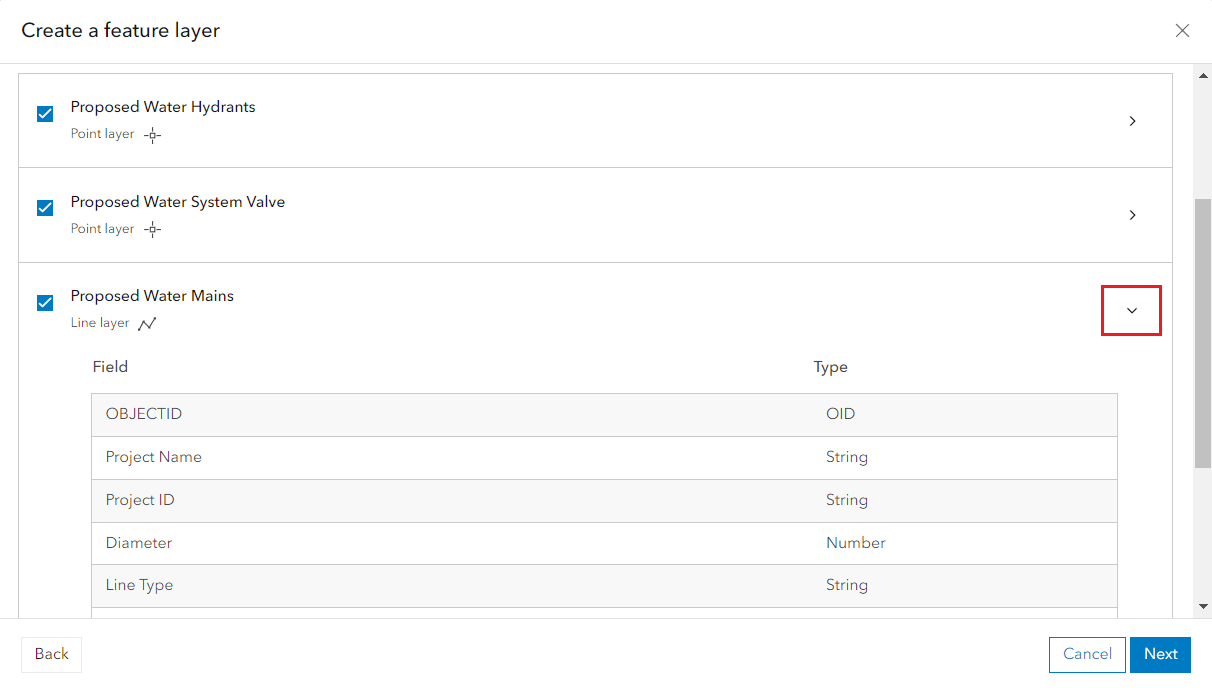
7. The “Proposed Water Design” template contains point and line layers (e.g., Proposed Water Hydrants, Proposed Water Mains). You can expand the layers by clicking the arrow next to it. A list of “Field” details will drop down so you can review the various attribute fields that are preconfigured for each layer. You will be required to enter information in these fields while collecting GNSS positions.
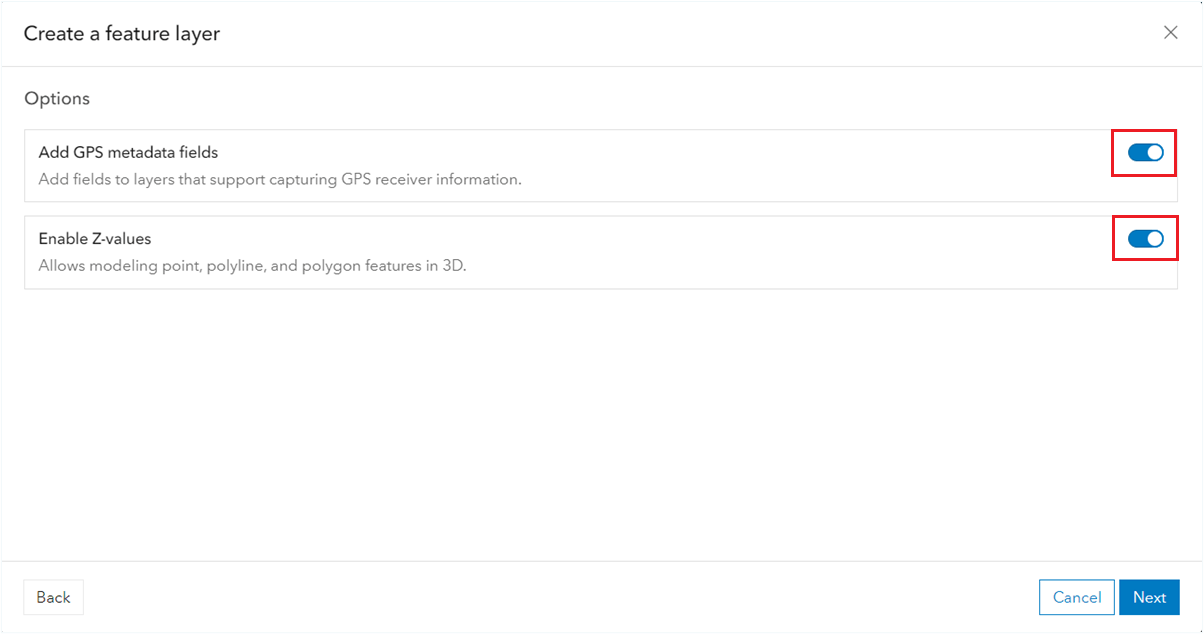
8. To add GNSS metadata fields to your layer, you will need to toggle on the “Add GPS metadata fields” button. We also strongly encourage you to toggle on the “Enable Z-values” option at the same time; this enables you to collect high-accuracy Z-values (for 3D positions) from the Arrow GNSS receiver. If left unchecked, all the features collected in this layer will be 2D (X and Y coordinates only). Note that Z-Values cannot be toggled on after the feature is created.
Note: The altitude values from the Arrow GNSS receiver are used by Field Maps in a few different ways. It’s important to understand these differences so the proper altitude reference — usually orthometric height — is available to the user in the field and office.
- Z-Values: These are elevations that are stored in the geometry of the feature along with the X and Y coordinates and are the source of the coordinates of the map. These elevations are not displayed to the user in Field Maps. They are stored in meters by default and their values cannot be changed. Enabling Z-values allows for further analysis and 3D modelling of elevation data in ArcGIS.
- ESRIGNSS_Altitude: This GNSS metadata field is automatically populated by Field Maps. It contains the raw ellipsoidal or GNSS height value, in meters.
- Attribute Table: These are elevations that can be stored in an additional field in the attribute table. This is not automatically populated by Field Maps; however, you can use the new field calculation tool in Field Maps to populate a designated field in a feature attribute table. This will make the orthometric visible to the field user and also in ArcGIS Pro. This can also be very useful to display you elevation in a different unit than in meters; in feet for example. In a few steps from now we will show you how to configure Field Maps to store orthometric heights, using an Arcade expression.
Side note: ESRIGNSS_Latitude and ESRIGNSS_Longitude values will store the latitude and longitude values as received (untransformed) from the GNSS receiver. If you have created a datum transformation in your location profile in Field Maps, the latitude and longitude values stored in the point geometry will be transformed and different than the above attribute fields.
9. Once you click “Next,” ArcGIS Online will ask you to name your new item. In this example, we’re going to give our new layer the title of “Proposed Water Design.” Consider that you might want to create a new project folder to store your feature layer and any additional similar feature layers related to the project (e.g., categorized by year, project location). Note that ArcGIS Online will also ask you what tags you want to associate with this feature layer. Since you’ve chosen an ArcGIS Online template, some tags will be automatically assigned to the layer; Esri does this with the intent of making your new feature layer easily searchable in your organization.
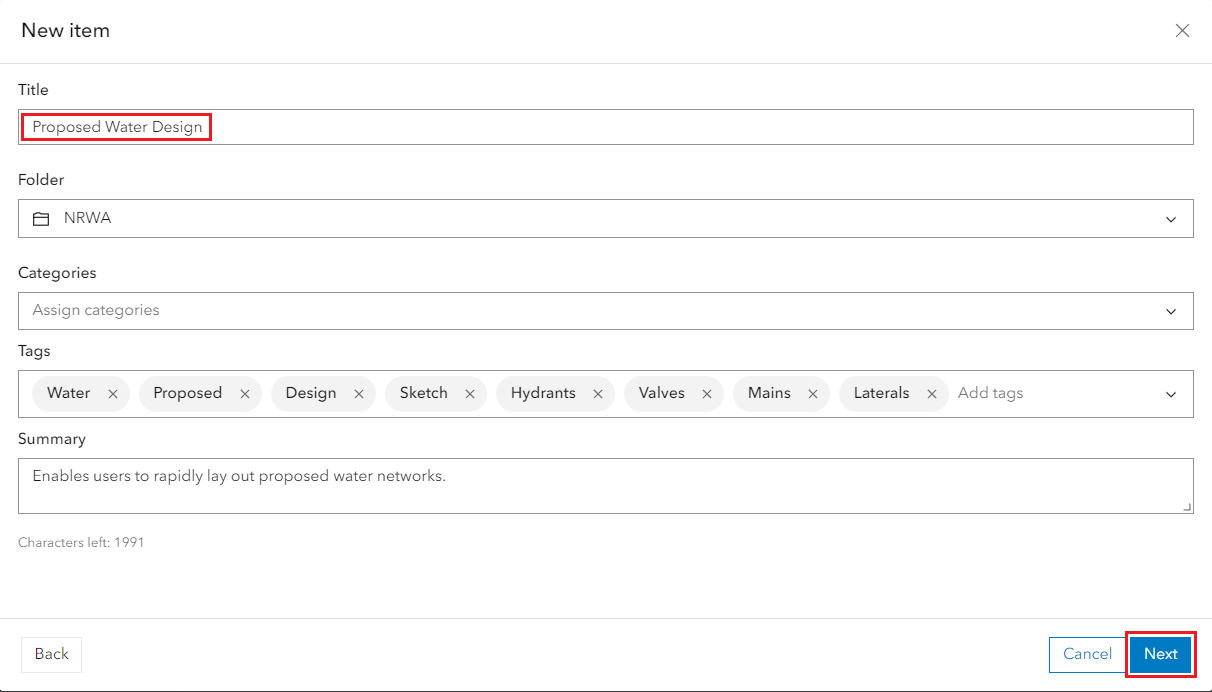
10. Finally, click “Save” and give yourself a high-five! ArcGIS Online will entertain you with a spinning blue circle while it creates your feature layer.

This layer will be added to your ArcGIS Online project folder and can be accessed from the Field Maps Designer web application. You can also add this layer to a web map with other layers, and then use it in Field Maps mobile app. Now let’s take a quick look at our new point layer: “Proposed Water Hydrants.”
Reviewing the Attribute Fields in Your New Feature Layer
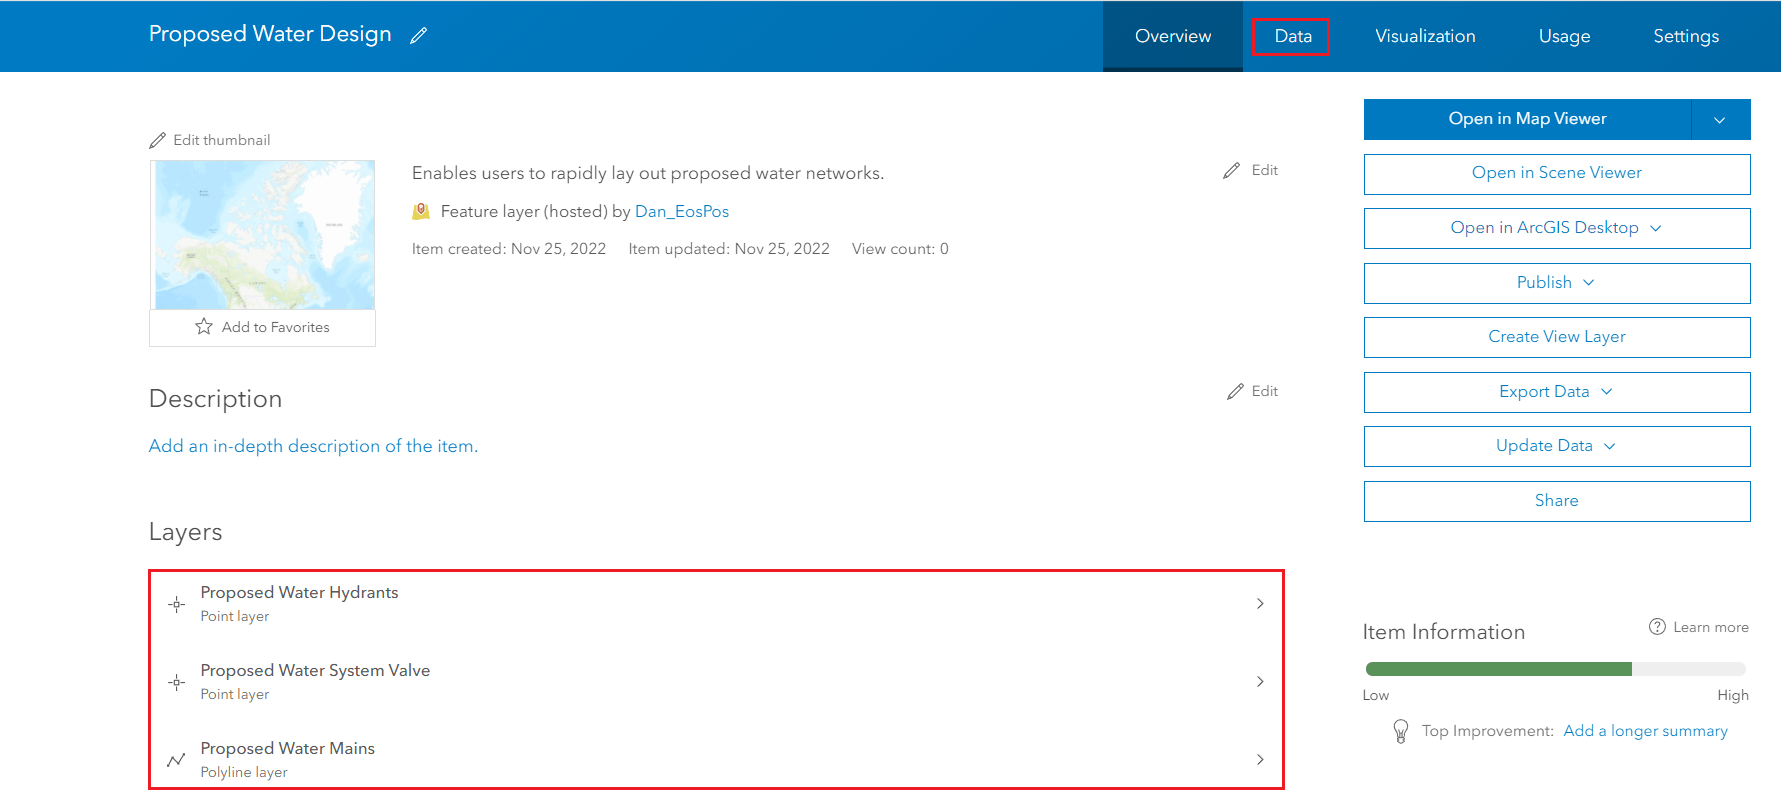
11. From your “My Content” tab and project folder, select the layer you just created. For us, we’ve selected the “Proposed Water Design.” This pulls up the item’s page. Let’s review the attribute fields in the layer we just created. To do this, you’ll first select the “Data” tab from the sub-navigation menu, shown in this screenshot in the top right.
12. The default view when your data webpage loads will likely be the table view of your data. To view as fields, change the view in your top-right corner by toggling the type from “Table” to “Fields.” You will now see the layer’s attribute fields from both the “Proposed Water Design” template’s default inclusions (e.g., “Project Name,” “Project ID,” “Expected Service Date”) followed by the GNSS metadata fields we added by toggling on the “Add GPS metadata fields” option. The GNSS metadata fields will always be listed after the template’s default fields; you can identify them because their “Field Name” will each start with the term “esrignss_.” These are the attribute fields that ArcGIS Online will use to collect and store the GNSS metadata from your Eos receiver.
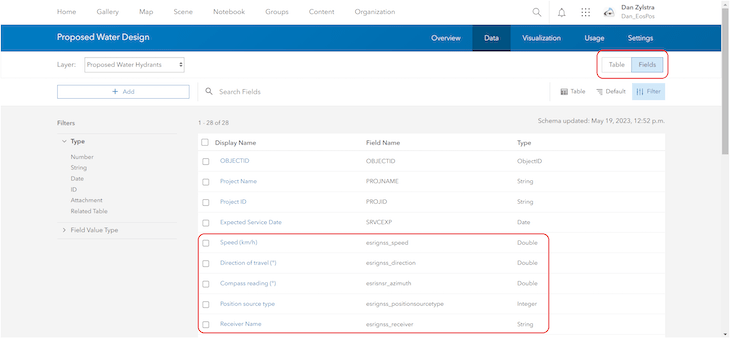
In total, there are 23 GNSS metadata fields — including “Receiver Name,” “Horizontal Accuracy (m),” “PDOP,” “Fix Type,” and “Number of Satellites” — to name just a few. All this GNSS metadata can be used for validating the quality of the GNSS positions.
Now let’s create a new field in the attribute table that will use an Arcade expression to calculate and store the orthometric height from the Eos receiver.
13. Select the “+ Add” button in the top left menu bar to add a new field to the “Proposed Water Hydrants” layer. You’ll get a popup similar to the one shown in the next screenshot. Your popup will ask for these field attributes:
- Field Name: We’ll use “Ortho_Height_m” but you could also use “Ortho_Height_ft”
- Display Name: We’ll use “Ortho Height (m)” but you could also use “Ortho_Height (ft)”
- Type: Select “Double” which is used to store values with decimals, such as GNSS elevations
- Default value (Optional): Leave this field blank
Click the “Add New Field” button.
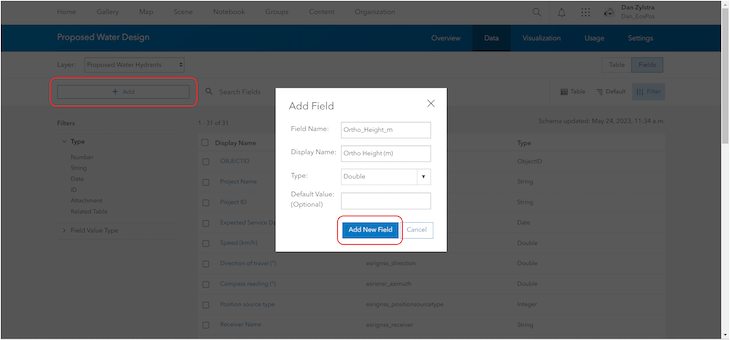
14.Your new “Ortho Height (m)” field will be added to the bottom of your list of fields.

You can repeat the process of adding height fields to all point layers that you will be adding to you web map. In this example we will also be collecting water valves so we will add the height attribute to that layer.
Note: Currently only point layers support the collection of orthometric heights.

Using the Field Maps Designer App to Add Layers to a New Map
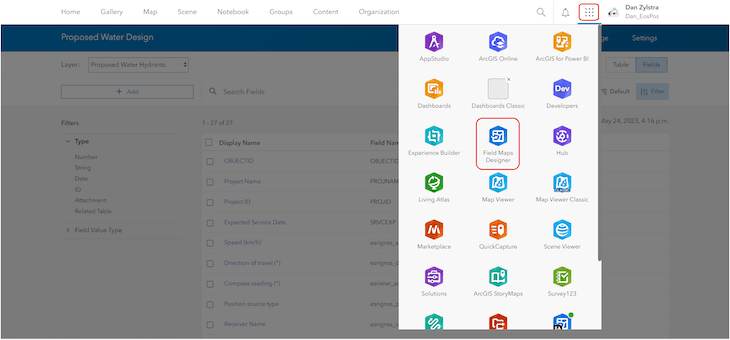
15. In ArcGIS, navigate to the main menu, where you will find the icon of a three-by-three grid of points; this opens your ArcGIS “App Launcher” from which you select the “Field Maps Designer” application.
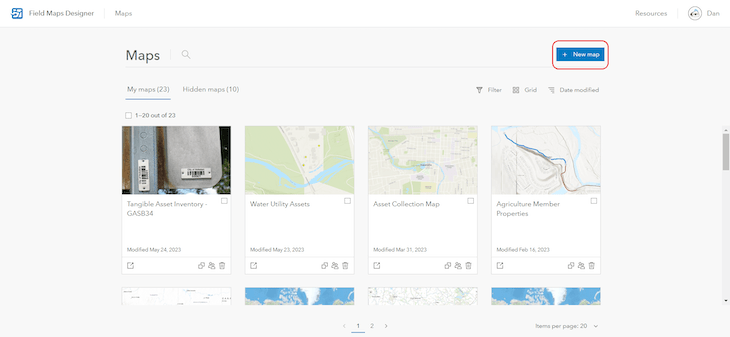
16. Your default view in Field Maps Designer will show the existing maps available to you, based on your user identity. We are going to create a new map in Field Maps Designer that we can use to configure the proposed service requirements our crews must capture in the field. Select “New map.”
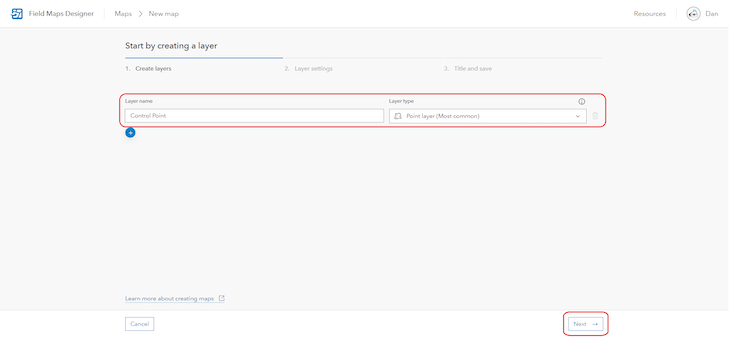
17. Now, you are prompted to “Start by creating a new layer.” This can be a point, line, or polygon layer. Let’s create a basic point layer called “Control Point.” We will select “Point layer” from the drop down. You may choose to add any other layers to this map. Once you have added all desired layers, click the “Next” button in the bottom-left corner.
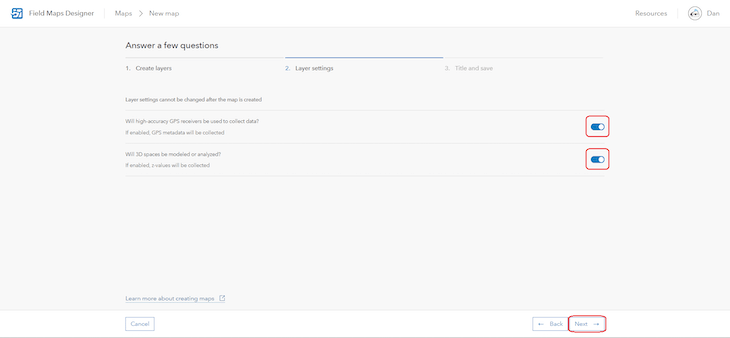
18. You will now be prompted to set your “Layer settings.” As we did before, let’s enable GNSS metadata and Z-values for any control points we collect. You’ll do this by toggling on the options for using high-accuracy GPS receivers to collect data and modeling and analyzing 3D spaces. We recommend toggling these on even if you are not sure if you will use these settings in the future.
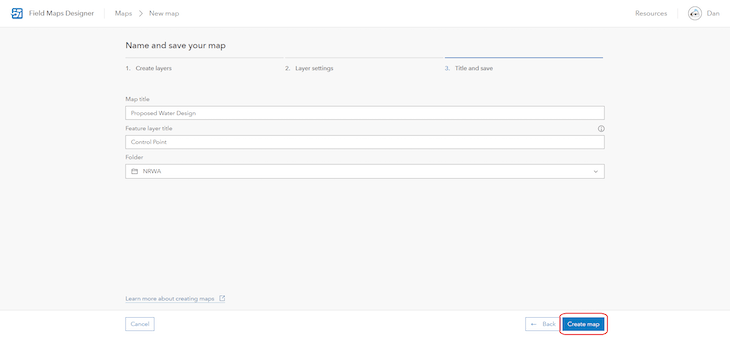
19. Next, you must give your map a title. We will call our map “Proposed Water Design.” You must also title your feature layer. In our case, we included just one layer, our “Control Point” layer, so we will select this from the drop-down menu: “Control Point.” Choose a folder to save your map, and click the “Create map” button.
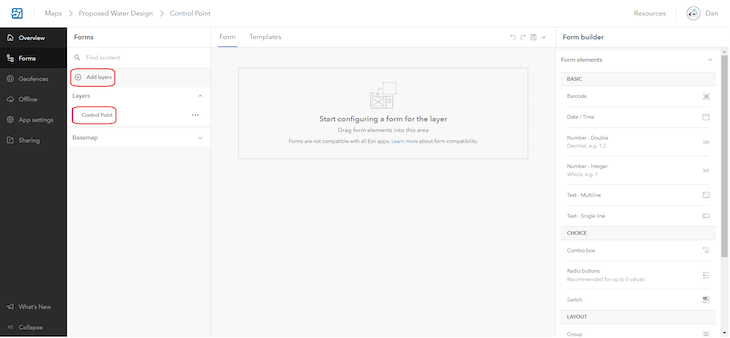
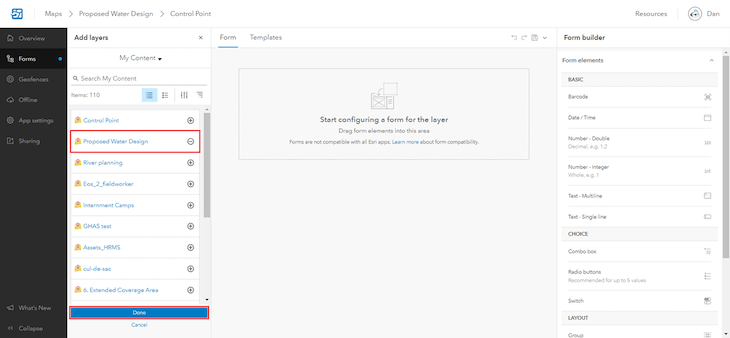
With your map created, you will enter the form builder interface of Field Maps Designer. This form builder opens with various menus. We will call your attention first to the left-hand sidebar, where you can see the “Control Point” layer we just created. You are asked to add a layer so you can work on its form. Click the “+” plus icon next to “Add layers” to select your first layer.
20. Next you will choose your layer to add. We would like to add the “Proposed Water Design” layer to this map. To do this, we will find the “Proposed Water Design” layer from the list of available items and select the plus sign “+” to the right of this layer. Once selected, its plus sign will turn to a minus sign “-” indicating to you that it has been successfully added to the form. Now that we have all the layers we need in the form, we can start configuring the form elements. Click the “Done” button in the bottom of the left-hand sidebar.
Creating Form Elements with Field Maps Designer’s Form Builder
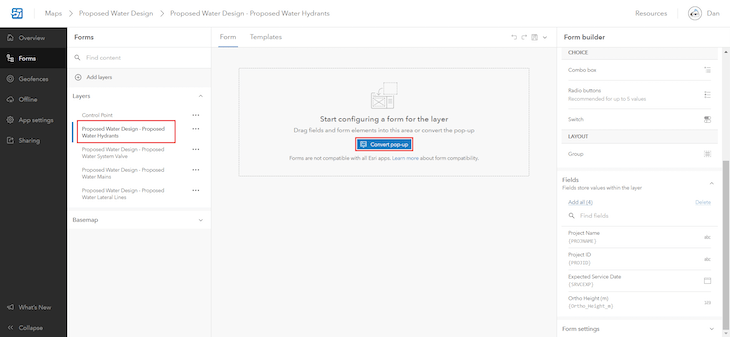
21. First you need to select the layer for which you want to build a data-collection form. Select one of the layers you want to start on. In our case, we will start with the “Proposed Water Hydrants” layer. With your layer selected, you can now click the “Convert pop-up” button. All of the fields in the layer will be added to the form.
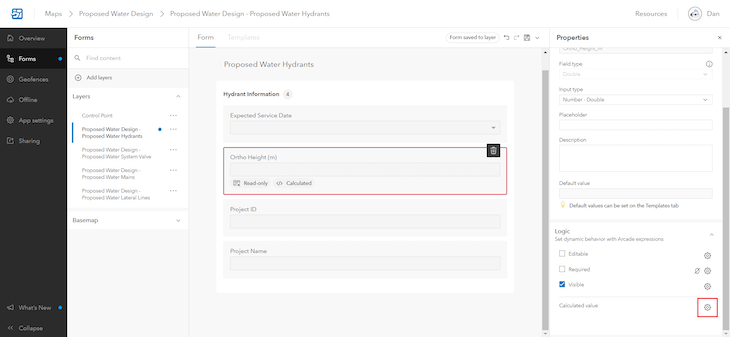
22. Field Maps Designer creates an editable version of a draft form by drawing from many of the properties, attributes, and symbology included in the proposed water design and control point layers. You can see some of the proposed form elements (e.g., “Expected Service Date,” “Ortho Height (m)”), “Project ID,” “Project Name)” under “Hydrant Information” in the next screenshot. Let’s configure one of these proposed form elements. We’ll start with the orthometric height in meters. Select “Ortho Height (m)” from the form elements. When you do this, the right-hand sidebar will launch the properties of your selected form element. Within this sidebar, scroll to the bottom the form properties and select the gear icon beside “Calculated value”.
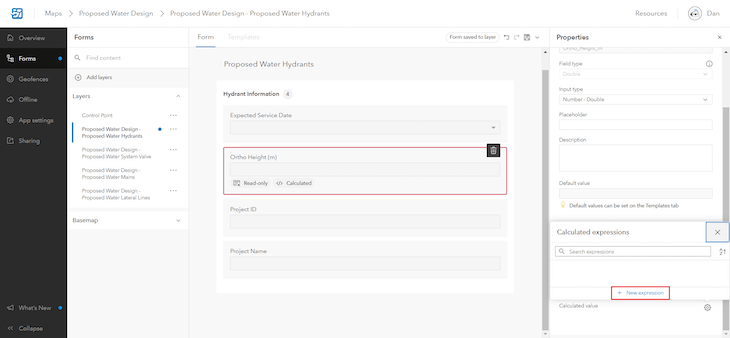
23. Next, you can select “+ New expression.” This will launch an Arcade expression editing window.
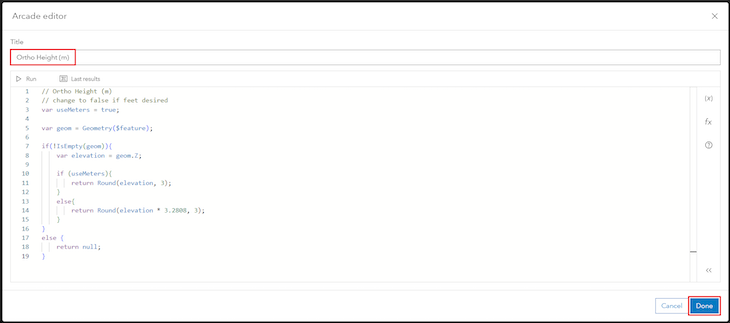
24. In the new “Arcade editor” expression window, give your new expression a name, such as “Ortho Height (m),” as we’ve done here. Next, click the “Done” button.
Now we are going to use an arcade expression that will query the GNSS metadata for the orthometric height value and store it in the form. Note that the field must be read-only if it is having a calculated value. If it is set to editable then the script will not run, and the field will remain blank. Select “Done.”
// Ortho Height (m)
// change to false if feet desired
var useMeters = true;

var geom = Geometry($feature);

if(!IsEmpty(geom)){
    var elevation = geom.Z;

    if (useMeters){
        return Round(elevation, 3);
    }
    else{
        return Round(elevation * 3.2808, 3);
    }
}
else {
    return null;
}
25. Now that the “Ortho Height (m)” script has been added to the form via the expression builder, Field Maps will know to query the Z-value coming from the Eos GNSS receiver and run this script to populate the “Ortho Height (m)” field. Select the “Save” icon to continue.
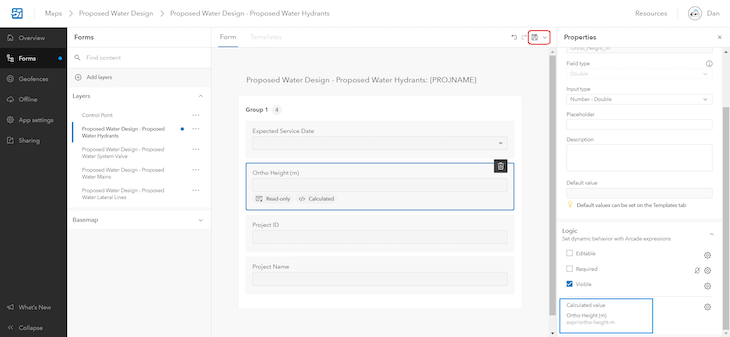
Repeat steps 22 to 25 to add orthometric height in meters to each point layer, as desired.
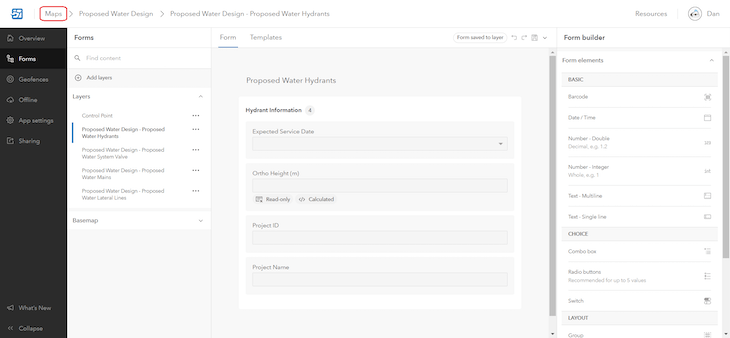
26. Return to the Field Maps Designer home screen by selecting “Maps” in the top-left menu navigation of your desktop screen.
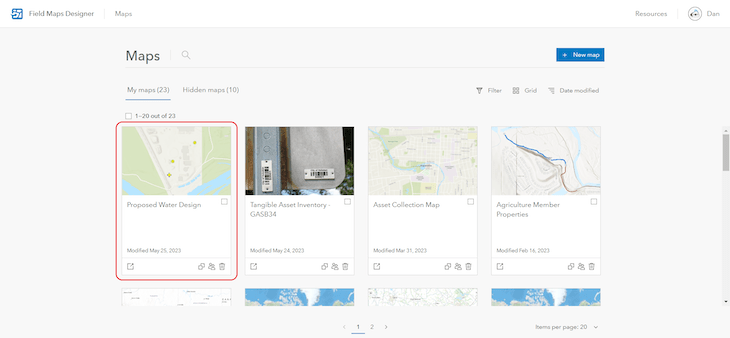
You will now see the map you created and configured listed in your Field Maps Designer home page. In this screenshot, we see the “Proposed Water Design” map whose data-collection forms we just configured.
Collecting High-Accuracy Data in ArcGIS Field Maps
Now that your field form has been configured, you are ready to collect data in the field. On your mobile device, open Field Maps. You should see the new map you created when you launch the application, provided your user credential has been given access to this map. If you don’t see the map then simply scroll down until you find it; if it is nowhere to be found, contact your ArcGIS administrator to request access to that map. Finally, for high-accuracy data-collection to work, make sure to have your Eos GNSS receiver connected to your mobile device.
27. Within the Field Maps mobile app on your tablet or phone, tap the “Proposed Water Design” map from your list of available apps. This will launch the map, and you can begin collecting data.
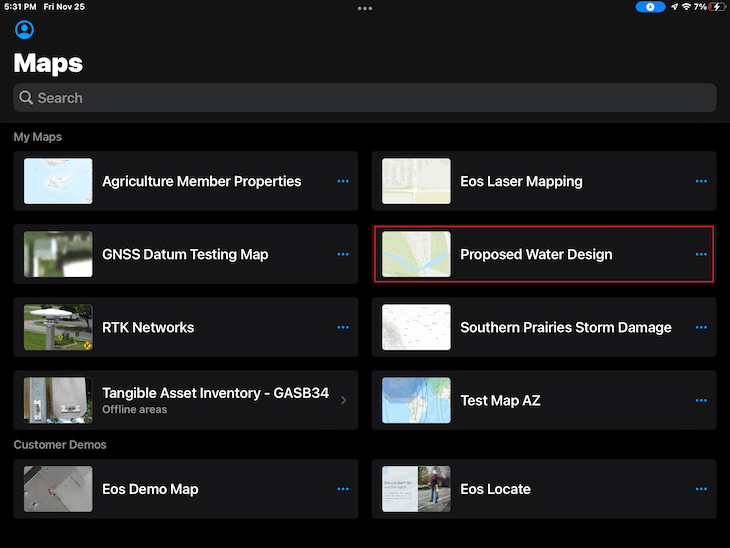
28. Field Maps shows any field user your real-time “GPS accuracy” from the Eos receiver at the top-center of your map. In this case, our Arrow Gold® is connected to the RTK network and is getting centimeter accuracy. (Yes, you may celebrate!) To collect your first point, tap the blue icon in the bottom right corner of the map display.
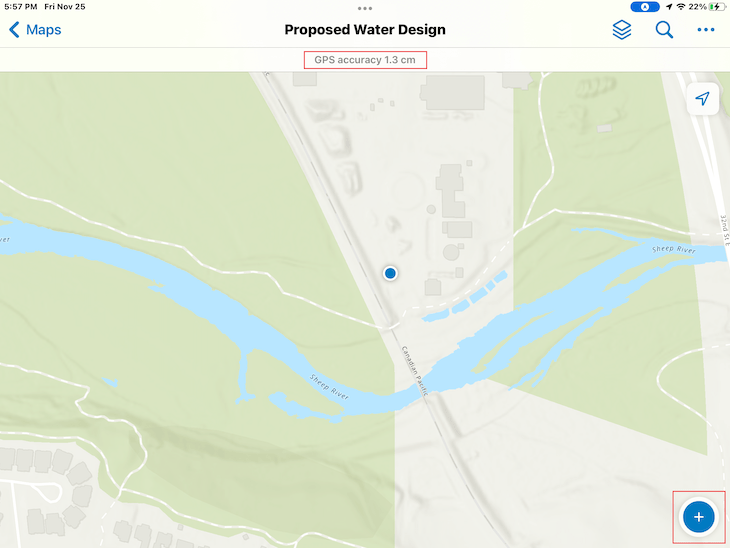
29. The list of layers in the “Proposed Water Design” you configured in ArcGIS Online will open. Let’s create a new hydrant (i.e., “Proposed Water Hydrants”). You will be prompted to fill out any required fields in the form, and you might notice that the “Ortho Height” field is automatically populated with the elevation value derived from the script. When the form is completed, click the “Submit” field in the top-right menu corner.
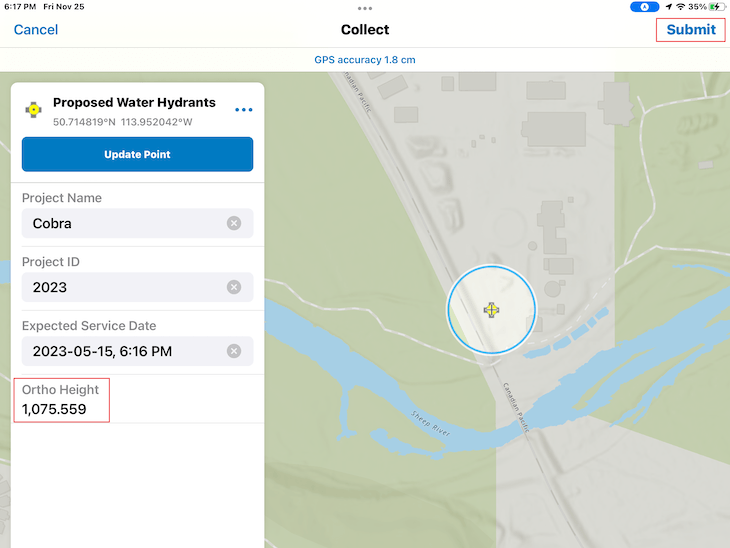
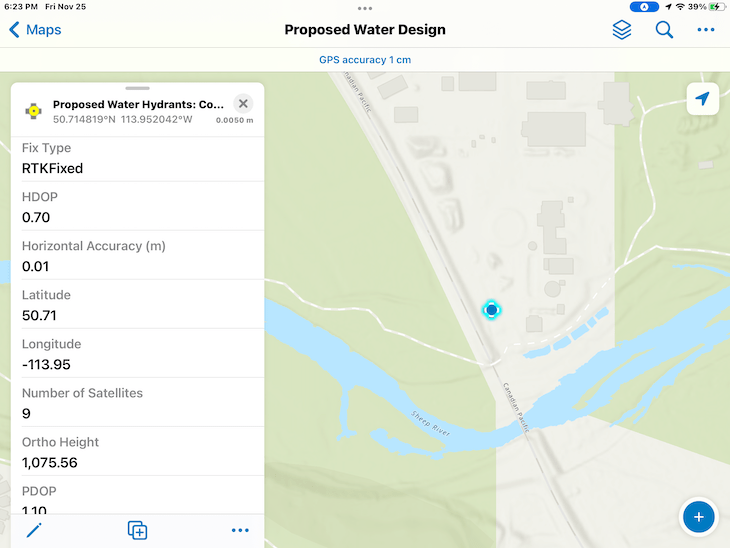
30. After submitting the new hydrant, the feature attributes and GNSS metadata can be displayed in a pop-up window by selecting the point from the map. This enables the field user to review the GNSS coordinates (including the ortho height, horizontal accuracy, fix type, and more). The new hydrant feature is synced back to the web map in ArcGIS Online in real time if the device has an internet connection.
31. After the form is submitted from Field Maps, the new hydrant location, attributes, and metadata are synced back to our web map in ArcGIS Online. The sync will happen in real time if a mobile internet connection is available in the field, or as soon as the mobile device connects to WiFi or a cellular network.
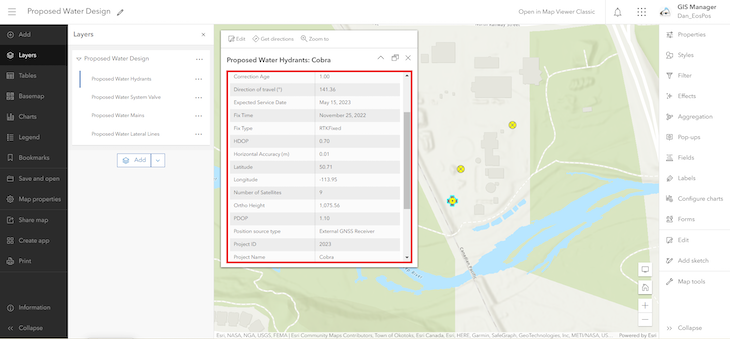
You can see that in this example, the proposed hydrant location we collected in Field Maps shows in our web map. The pop-up displays the attribute data from the template (e.g., “Project ID,” “Project Name”). It also shows the GNSS metadata fields populated from the Eos receiver (e.g., “Correction Age: 1.00,” “Fix Type: RTKFixed,” “Horizontal Accuracy (m): 0.01”).
Also, notice that the field we manually added with our Arcade script, “Ortho Height,” has been populated with the calculated elevation in meters.
Key Takeaways of Creating an ArcGIS Web Map for High-Accuracy Data Collection
As you can see, using a feature layer template in ArcGIS Online streamlines the process of creating a web map from scratch, all in a matter of minutes. We’ve shown you how to collect and store important GNSS metadata for every feature you capture in ArcGIS. Your field crews will be able to use the Field Maps mobile app to collect standardized, high-accuracy GIS data using their iOS® or Android™ device of choice and an Eos GNSS receiver. We’ve also shown you how to use the Field Maps field calculation tool to compute the orthometric height from the GNSS elevations collected by the Arrow receiver. Starting a web map for your organization’s field data collection has never been simpler.
For more great articles like this one delivered right to your inbox, subscribe to our monthly newsletter.

