This guide is intended to help you learn how to configure ArcGIS, ArcGIS Collector® and Eos Tools Pro so you can begin to use laser offsets and log orthometric heights.
Required Minimum Firmware and App Versions:
Before beginning, make sure you have the required firmware and software versions.
- Arrow Bluetooth Firmware: 2.2.822
- Eos Tools Pro: 1.74 (build 187)
- ArcGIS Collector: 18.0.2, (build 2109)
- ArcGIS Pro: (current version)
Please note that this workflow is available only for Collector Classic (not Aurora).
Table of Contents:
- Creating Your Feature Attributes in ArcGIS
- Configuring Collector to Interact with Eos Tools Pro
- Configuring Eos Tools Pro for Orthometric Heights
- Configuring Eos Tools Pro for Laser Offset Measurements
Step One: Creating Your Feature Attributes in ArcGIS Pro
If you are new to ArcGIS, you’ll need to refer to the Esri ArcGIS documentation on how to create feature attributes in your map layers.
Download the Eos Laser Mapping™ metadata fields
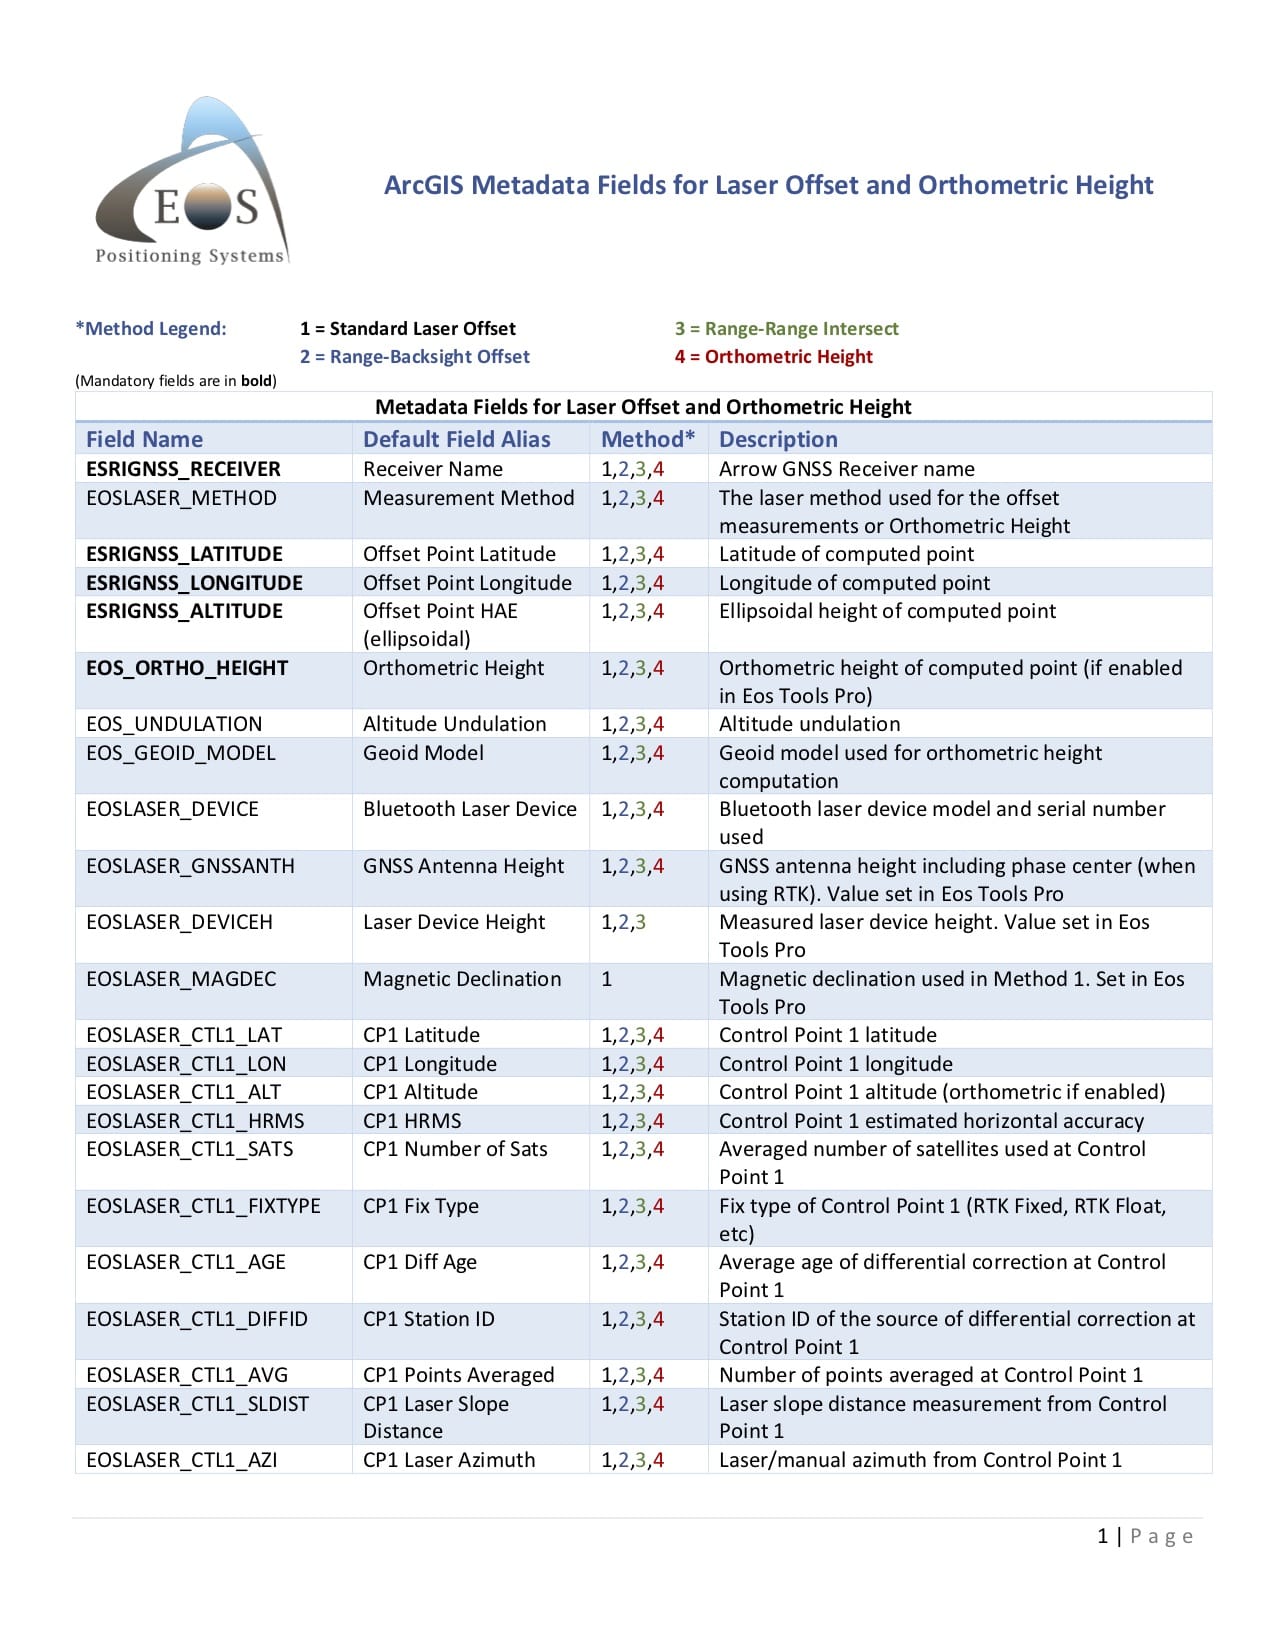
The metadata fields required look like the image below. Be sure to download them so you have the proper attributes in your Esri layer.
Esri ArcGIS Documentation:
- Read “Enter attributes for new features“
- Read “Edit feature attributes“
Once your feature attributes are created, you’ll be able to use your ArcGIS Online web maps to collect laser-offset and orthometric-height measurements from your Arrow receiver.
To do this, you’ll need to add the attributes that are required for your workflow, or for quality control. Eos is providing a free Python script that contains all the metadata fields you’ll need. To help you determine which fields to add, we’ve put together this table that shows you all the possible metadata fields you might want to add. The list is exhaustive — containing measurements and intermediate results related to every step of the three types of laser offset methods we support. To help you understand which attributes possible, we’ve put together an exhaustive list of all the possible fields, with the mandatory fields displayed in bold.
The following table lists all the metadata fields sent by Eos Tools Pro after a laser offset measurement. Bolded fields represent mandatory attributes. The default aliases can freely be changed in the Python script itself or manually in ArcGIS.
To add the required fields to your map, you can either use the Eos Laser Offset Python script to automatically add them, or you can add them manually.
Let’s start with the Python script.
How to Use the Eos Laser Offset Python Script to Add Fields in ArcGIS Pro
By running the Eos Laser Offset Python script in ArcGIS Pro, you can automatically add the required laser-offset metadata fields.
Just follow these steps to run the script:
a) Download the Eos Laser Offset Python script
b) Add the Python script as a tool in ArcGIS Pro
- Open ArcGIS Pro. Create a new project (e.g., “MyProjectName”).
- Expand the “Toolboxes” section in the Catalog pane (defaults on the right).
- Right-click on “MyProjectName.tbx”.
- Scroll over “New” and select “Script”. A new window will open and allow you to configure the script as a tool.
- Click the “Browse” icon next to the script location box. Locate the Eos Laser Offset Python script file on your PC. It should be in your downloads folder unless you saved it elsewhere.
- Click on the “Parameters” category in the menu on the left.
- Enter the following information: The “Label” is “Layer”. “Name” is “Layer”. And “Data Type” is “Feature Class”.
- Click “Ok”.
c) Run the Python script (now a tool) on a feature class
- Double-click on the script tool under MyProjectName.tbx.
- Point the tool at a point-typed feature class.
- Click “Run”. This will add the required offset fields to your feature class.
If you don’t want to run the Python script, you can add the fields manually in ArcGIS Pro. Here’s how.
How to Add Laser Offset Metadata Fields Manually in ArcGIS Online
There are a couple of things to keep in mind if you decide to add your laser-offset fields manually.
First, note that your metadata fields (such as “fix type”) use domains. But domains cannot be added in ArcGIS Online. This means that the metadata fields will still be populated, but they will be displayed as numbers rather than “DGPS”, “RTK Float”, or “RTK Fixed”.
Second, if you’re not performing laser offsets, and therefore only the orthometric fields are needed, we suggest that you simply add these three fields as attributes:
- EOS_ORTHO_HEIGHT
- EOS_UNDULATION
- EOS_GEOID_MODEL
Please refer to the Metadata Fields for Laser Offset and Orthometric Height document.
If you’re ready to add your attribute fields manually, simply follow these ArcGIS documentation steps from Esri.
Step Two: Configuring ArcGIS Collector to Interact with Eos Tools Pro
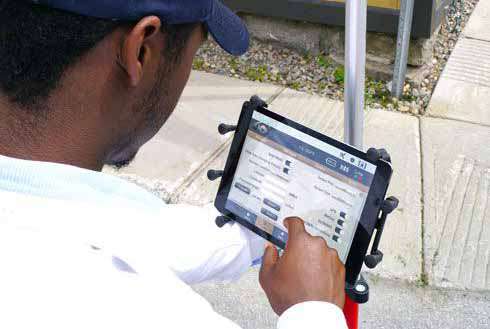
In this section, we will show you how to designate Eos Tools Pro as the app that will be performing both the laser-offset and orthometric-height measurements inside ArcGIS Collector®.
Before you begin, you’ll want to have installed Eos Tools Pro. (Eos Tools Pro must be installed on your iPad® or iPhone® in order for Collector to be able to request and read measurements from it. Eos Tools Pro is available for free for iOS® on the Apple iTunes store, but you must have an Arrow receiver to use it.
First, let’s set up Eos Tools Pro to compute your laser offsets. It takes three steps inside Collector.
How to Tell Collector to Call on Eos Tools Pro for Laser Offset Measurements
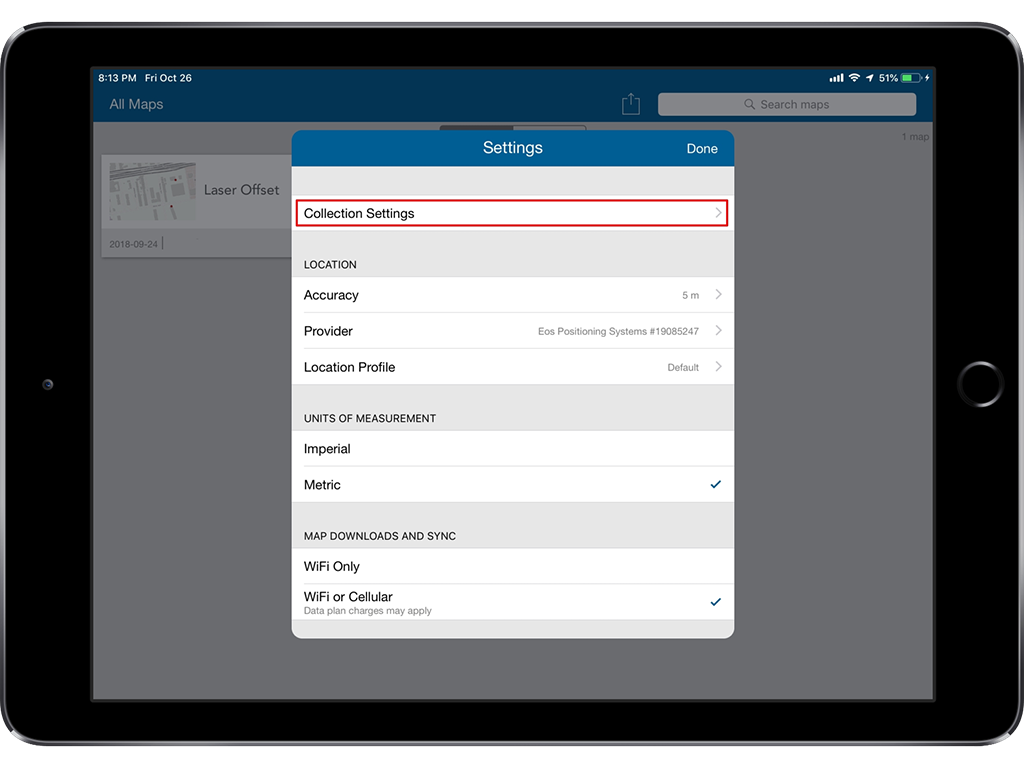
1. Open Collector. In the “Settings” menu, tap on “Collection Settings”.
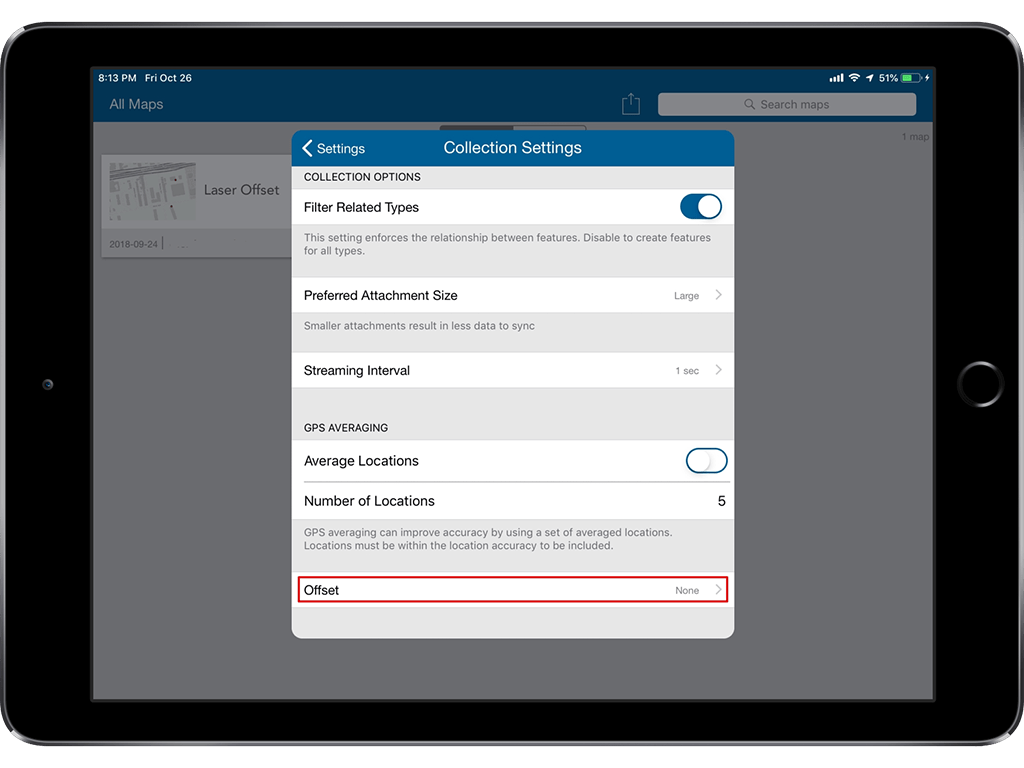
2. Scroll down and tap on “Offset”.
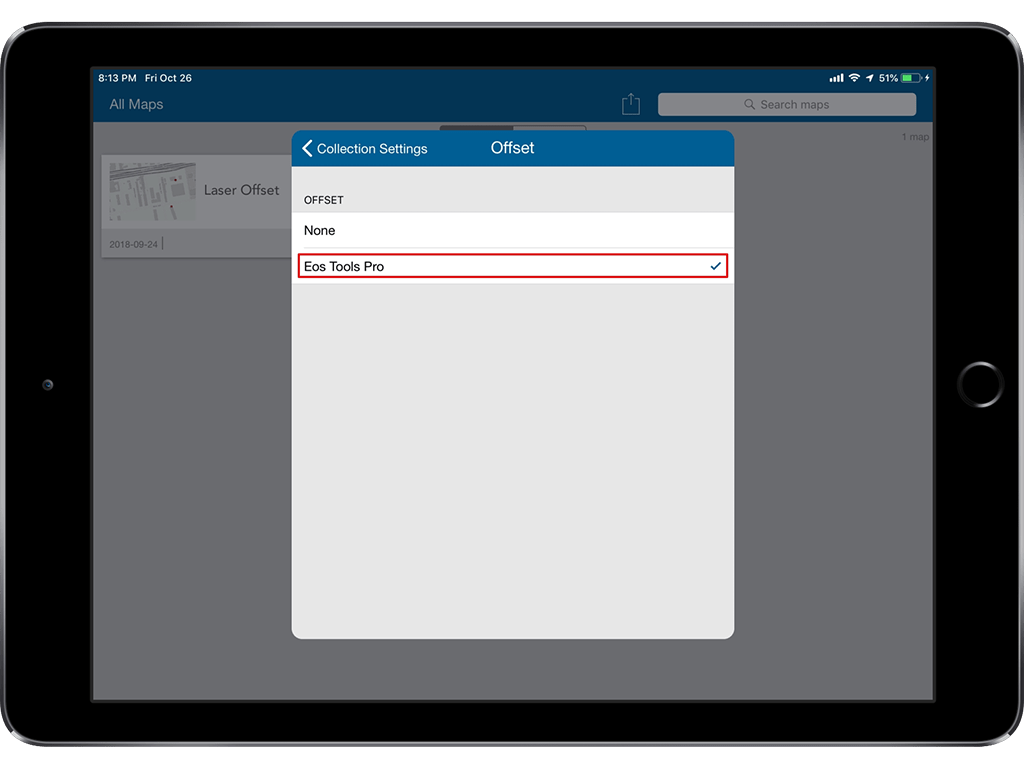
3. Select “Eos Tools” Pro as the source of offset measurements.
Next, let’s make sure Eos Tools Pro is set up to provide Collector with orthometric heights.
How to Configure Eos Tools Pro for Orthometric Heights in Collector
In this section, we will show you how to configure Eos Tools Pro and the Arrow receiver to output orthometric height measurements to Collector, from built-in geoid models within Eos Tools Pro.
1. Open Eos Tools Pro, and tap on the “Config” tab at the bottom of the app.
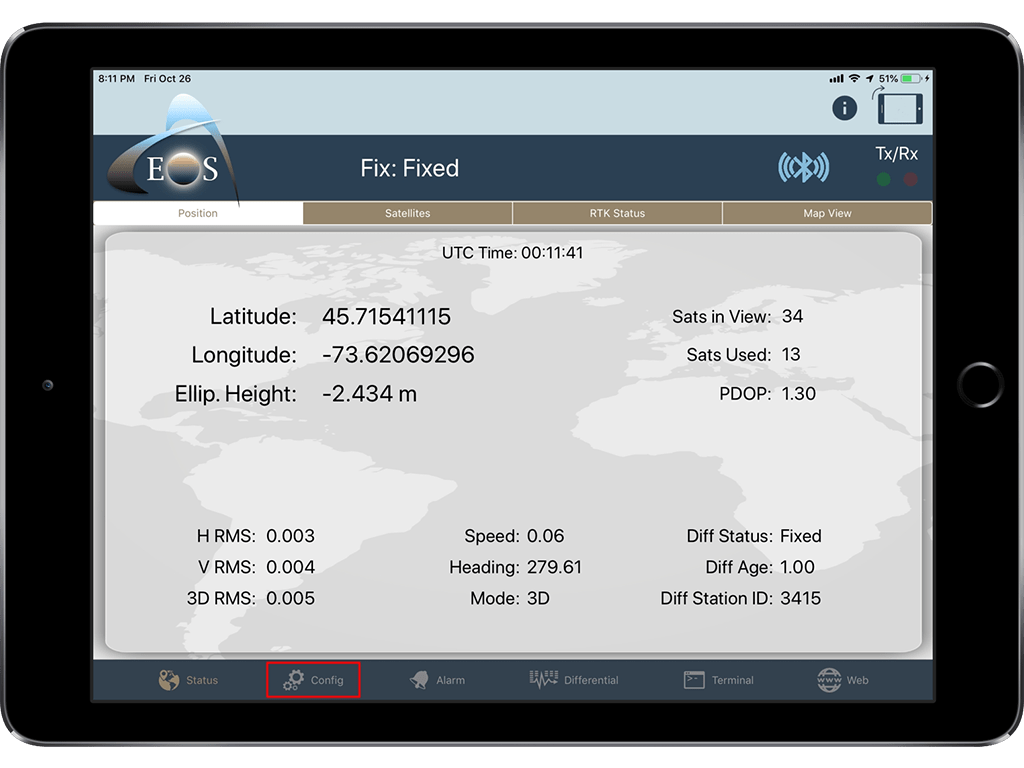
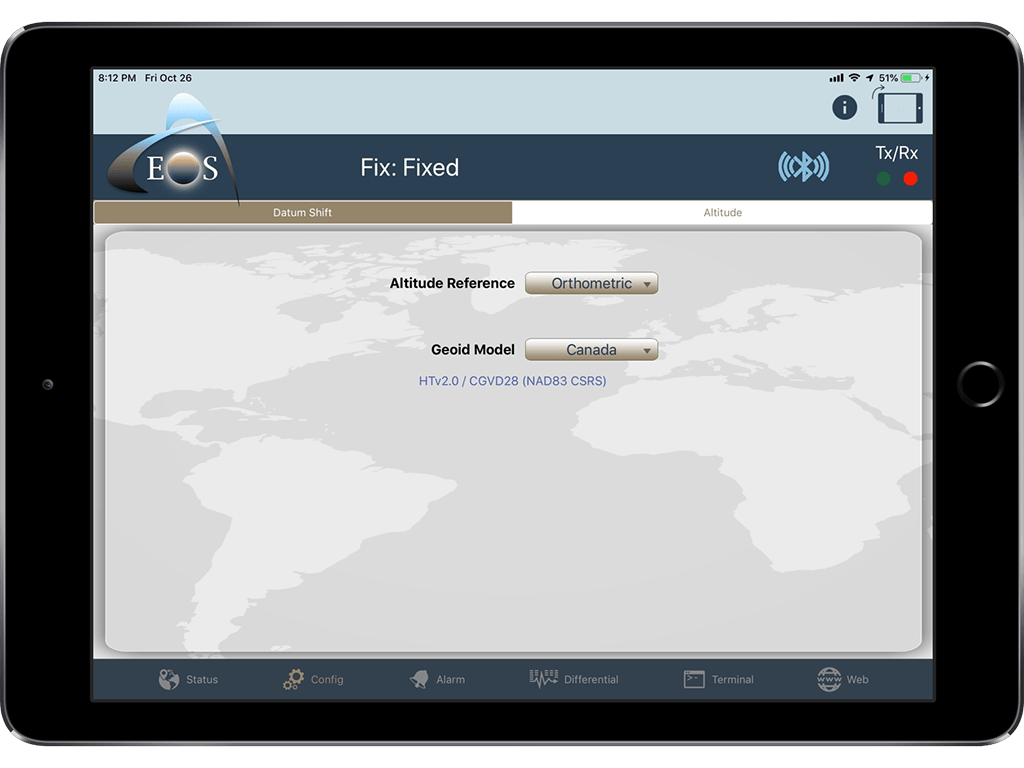
2. Select “Altitude” in the upper menu bar. From the “Altitude Reference” pull-down, select “Orthometric”.
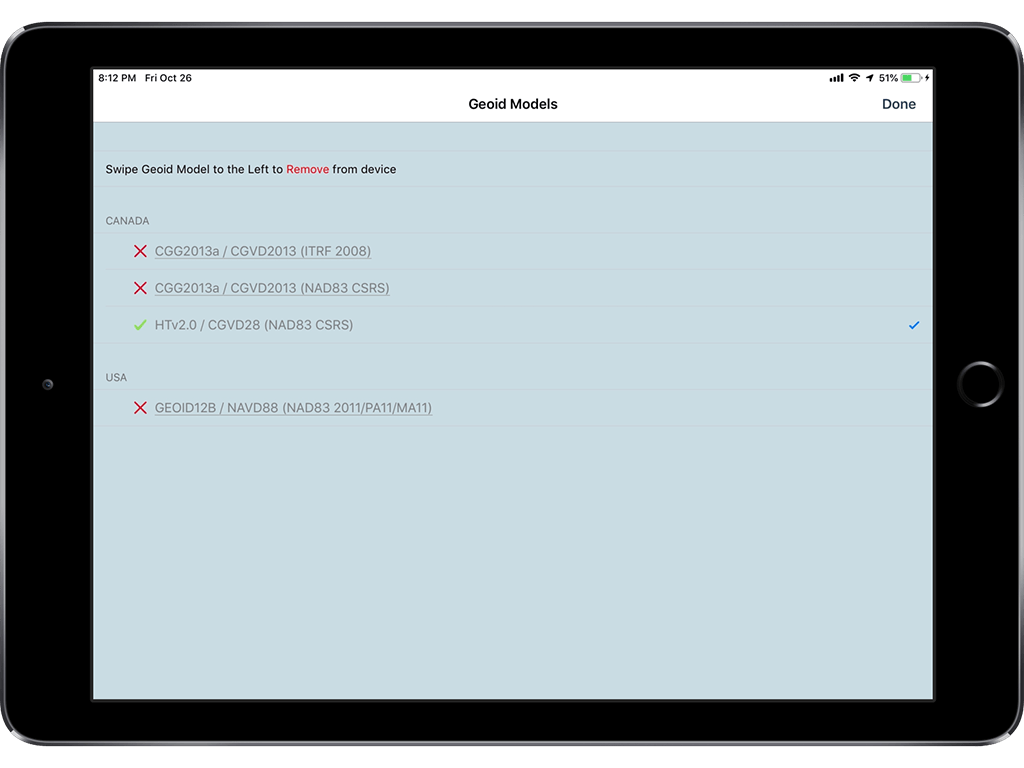
3. Now you’ll see a list of the available (downloadable) geoid models pop up. Scroll down to your country, and select the geoid model you wish to download. Once you’ve downloaded the correct geoid model, select it by simply tapping on it. Then tap on “Done”.
Note: The Geoid model that is in use will be displayed on the main Eos Tools Pro status page, right below the receiver’s coordinates.
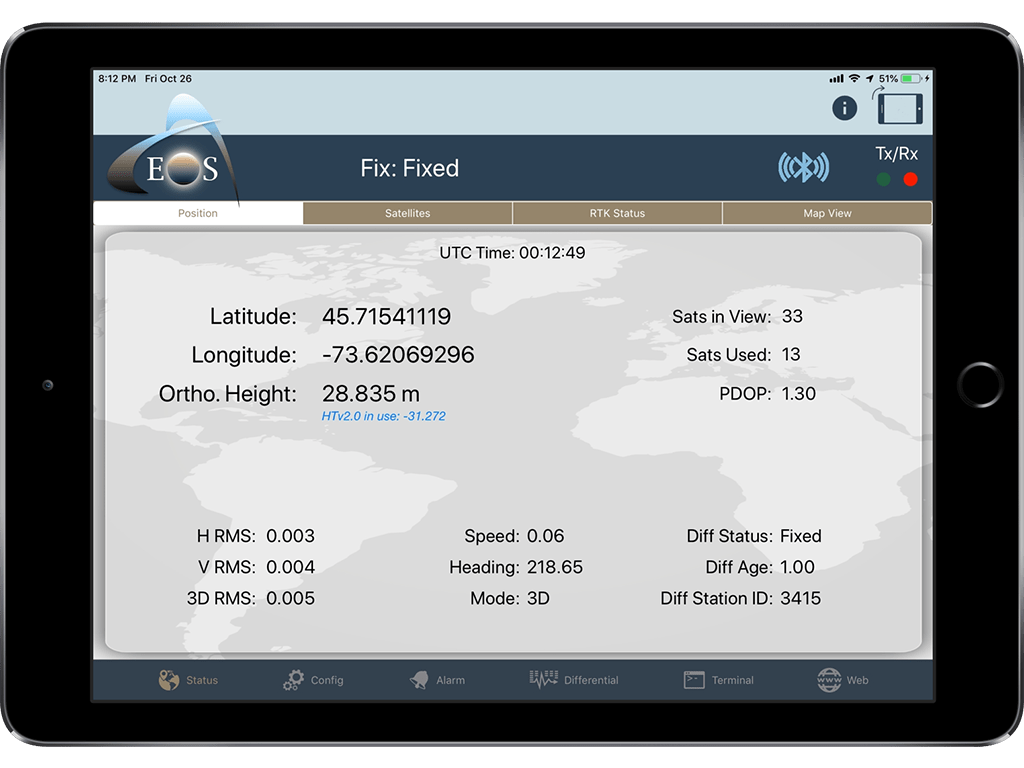
Now that your geoid model is set within Eos Tools Pro, you’re ready to configure the laser offset settings.
How to Configure Laser Offset Settings in Collector and Eos Tools Pro
The last setting to be configured inside Eos Tools Pro takes place in the Laser Offset page. This page is activated only when Collector calls Eos Tools Pro for a measurement.
1. With Eos Tools Pro running in the background, open Collector. Select a point feature to be recorded.
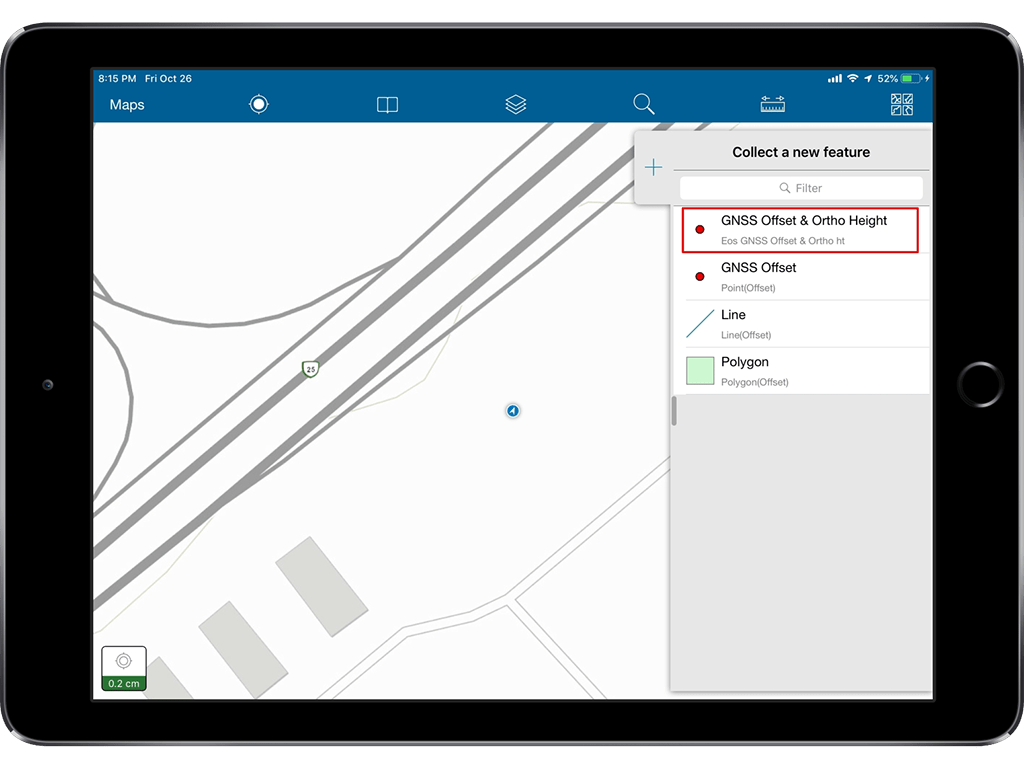
2. Next, select the location icon that appears on the top left of the app.
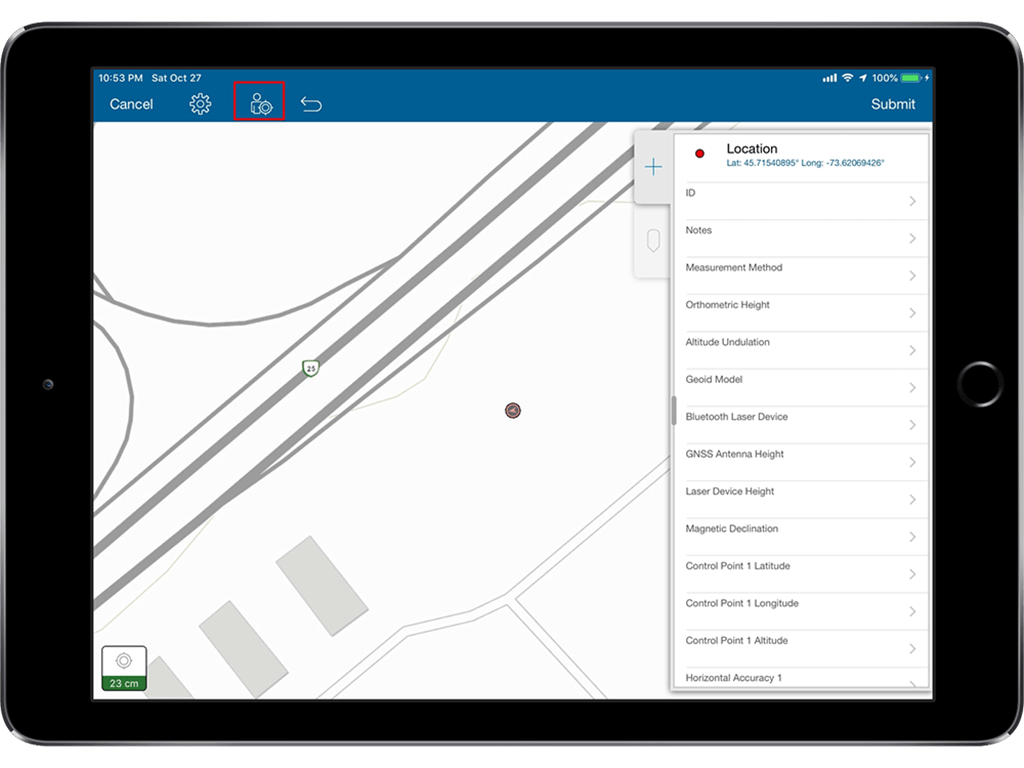
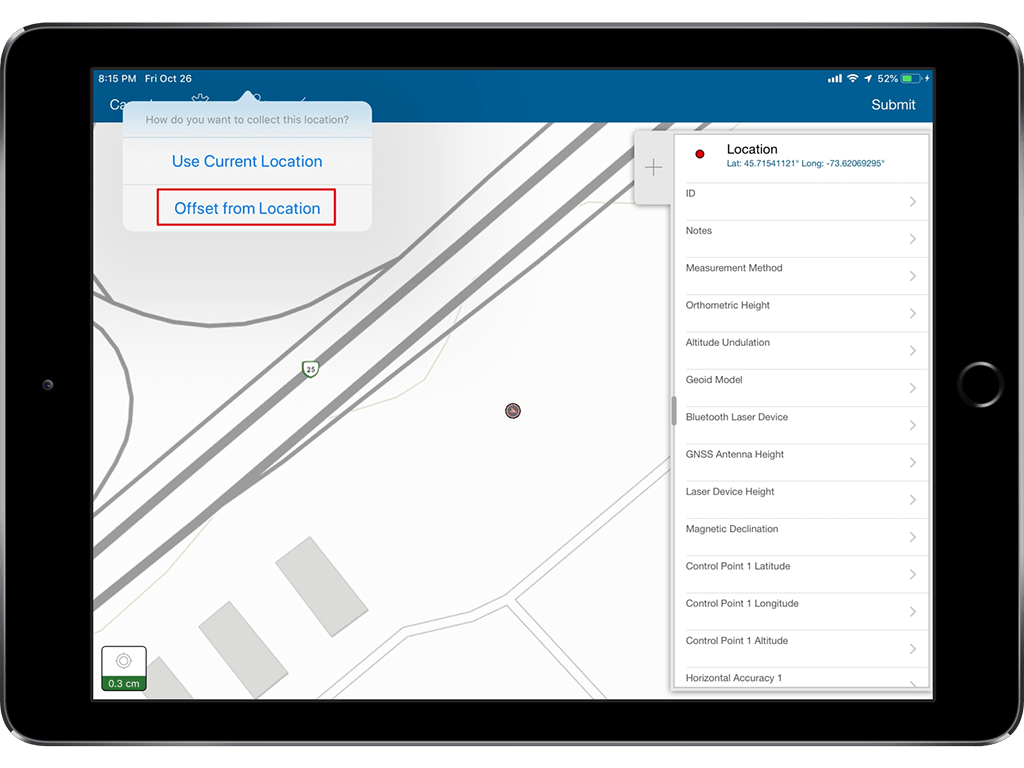
3. Collector will give you a pull-down menu. Select “Offset from Location” in the menu. This is going to call up the Laser Offset page within Eos Tools Pro.
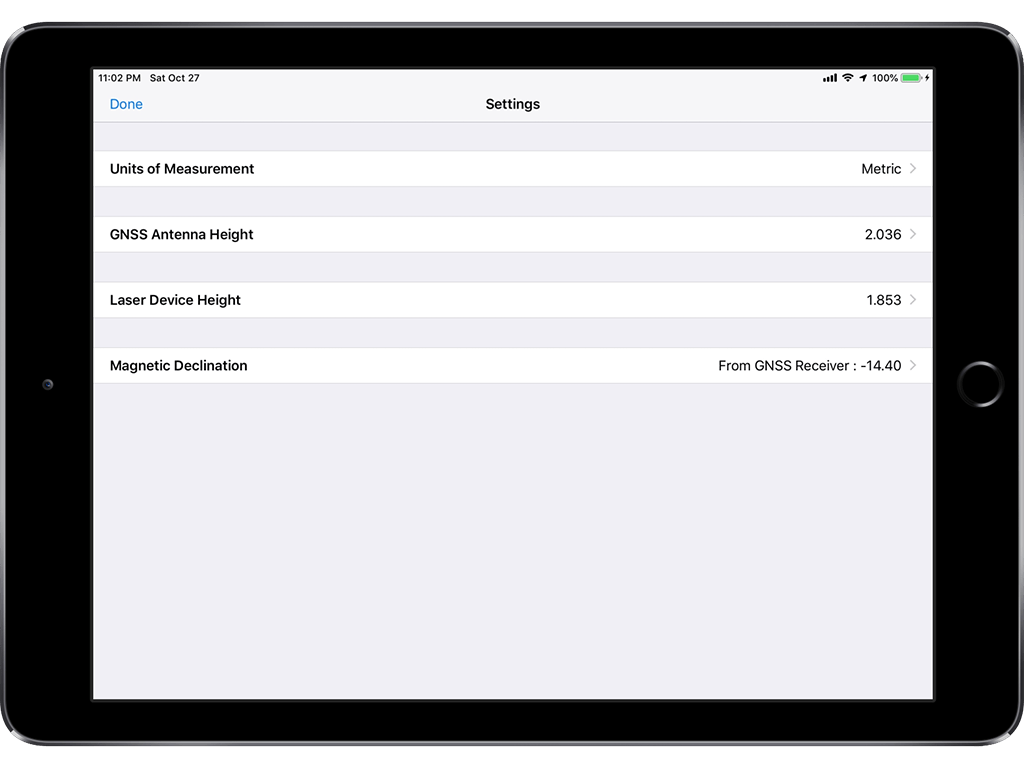
4. Inside the Eos Tools Pro Laser Offset page, tap on the “Settings” tab.
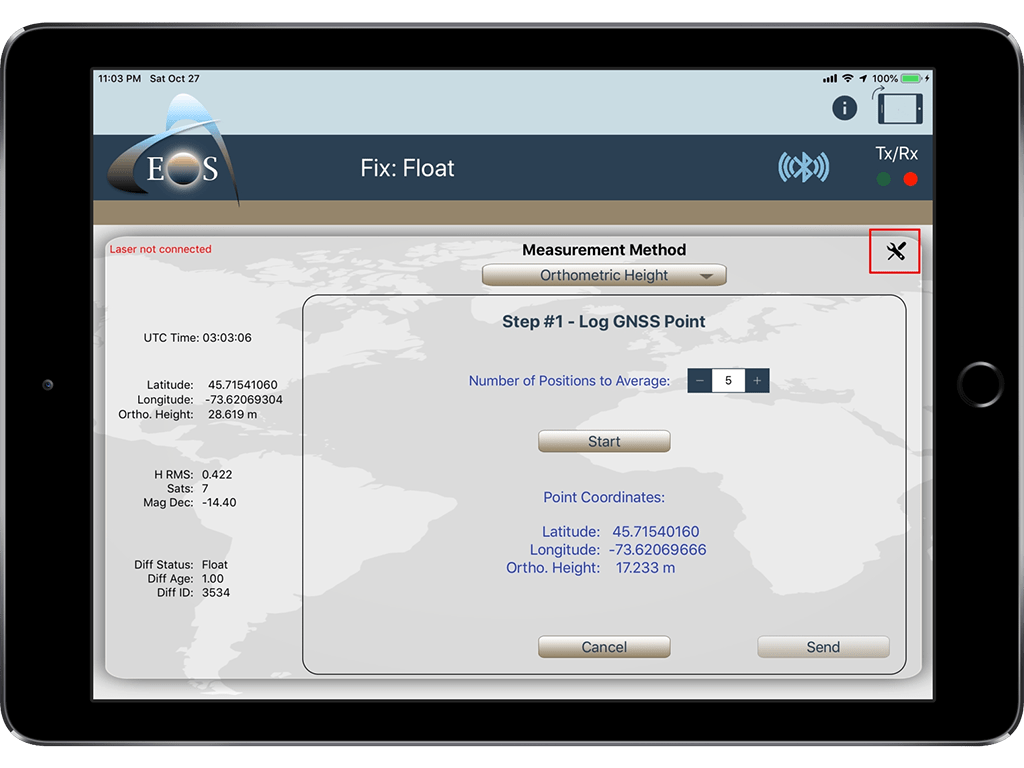
5. Set the “Units of Measurements” to “Metric”. Next, set the proper heights for the antenna and the laser device. To set the “Magnetic Declination,” you have two options: Either Eos Tools Pro can read the magnetic declination from the Arrow, or you can set this value manually.
Congratulations! You are now ready to collect with orthometric height and/or take laser-offset measurements directly inside your webmaps in Collector.

