Summary
In this article, you will learn how to configure your Arrow Gold to output RTK corrections. Here are the main steps that will be explained in “How To Set Up Your Arrow Gold As A Base Station”.
Worldwide, the availability of — and desire to use — RTK networks for GNSS corrections is growing. While some RTK networks are free, others require a paid subscription. More organizations are deciding to set up their own base station (at the office, in the field), and in many situations this could be the best option. For instance:
- No RTK: There are no RTK networks or base stations in your working area.
- No Cell Signal: There is no cell coverage in your working area and a paid Atlas® satellite correction service is not accurate enough for your application.
- RTK Network Cost: There is only one RTK network in your working area and it is expensive, so an annual subscription cost would be onerous, especially if you have multiple rovers (GNSS receivers) in the field. The cost to set up a base station can be far less.
- RTK Network Limitations: There is only one RTK network in your working area, and it does not utilize all four GNSS constellations (GPS, GLONASS, Galileo and BeiDou) and/or all three frequencies (L1, L2 and L5). RTK networks with older technology often are limited to GPS/GLONASS and L1/L2. However, a rover receiving corrections from a base station that supports all constellations and frequencies may experience much more reliable RTK performance, such as when the rover moves farther from the base (long baselines) and under light foliage (multipath).
To set up a base station at your office, you can use an Arrow Gold GNSS receiver with an Internet connection and Eos Server (our paid server, which you can contact us to learn more about). To set up a base station in the field, you can use the Internet option (connected environments only) or radio modems for disconnected environments. In this article, you will learn how to configure your Arrow Gold to output RTK corrections. Here are the main steps that will be explained:
- Connect your Arrow Gold to a PC (via USB or Bluetooth®)
- Configure the Arrow Gold to operate as a base station (via Eos Utility)
- Determine the reference location/coordinates of your base station antenna, and save it to the Arrow’s memory
- Broadcast corrections (via Eos Server or radio modem)
Step 1: Connect your Arrow Gold to a PC (via USB or Bluetooth®)
For detailed explanations about establishing a USB or Bluetooth® connection between the Arrow and your PC, please refer to the Arrow Quick-Start Guide.
For a USB connection:
Connect the Arrow to the PC using the USB cable supplied with your purchase. If your PC is connected to the Internet, the Arrow USB Drivers should download automatically from the Microsoft Download Center as soon as you plug the USB cable and Arrow into the PC. If not, then you can install the drivers manually using this setup file.
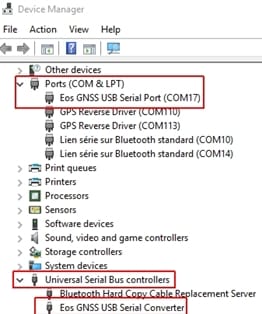
Once the driver is installed, confirm which COM port number Windows has created for the Arrow. To do this, enter the Device Manager of your Windows Settings and look for “COM & LPT”. Open the Ports (COM & LPT) to verify the COM port number. It should be named “Eos GNSS USB Serial Port”, as show below along with the COM Port number.
In this example, the COM port number is set to COM 17.
For a Bluetooth® connection:
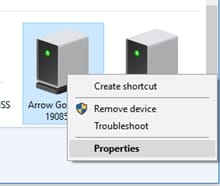
With the Arrow receiver powered on, pair the receiver with your PC via the Windows Bluetooth® settings menu. Once done, verify the COM port number by going under Devices and Printers on your Windows settings, and scroll down until you see your Arrow receiver listed with the proper serial number.
Right click on receiver icon and select “Properties”. Choose the tab called ‘’Services’’ and you will see the outgoing COM port of your Arrow receiver (some Bluetooth® stacks will show both incoming and outgoing ports for the same Arrow; you must select the outgoing one).
Note: After the pairing, make sure to uncheck the ‘’Apple’’ service box.
Step 2: Configure the Arrow Gold to operate as a base station (via Eos Utility on a Windows PC)
In this section we will first set the speed (baud rate) of the USB and/or Serial ports of your Arrow receiver and send a configuration file to the receiver.
- Download and install Eos Utility on your PC. Eos Utility is a free software that allows you to configure and monitor your Arrow receiver.
- Download the following Base Station Configuration File. Also, unzip its content into a folder on your PC.
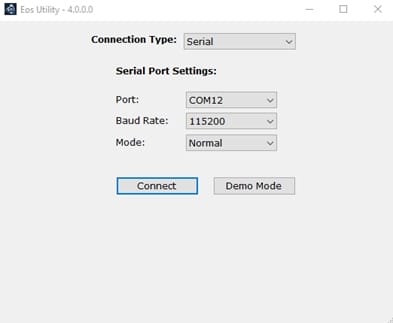
Launch Eos Utility and enter the required information to connect to your Arrow:
Connection Type: Serial
Port: Bluetooth® or USB COM port to your Arrow
Baud Rate: USB (19200, default) and Bluetooth® (irrelevant)
a) Set up the baud rate on the USB (and/or the optional serial) port
We will first set the speed of communication (baud rate) on the port that will be used to broadcast the differential (RTCM) corrections. Because the Arrow Gold will use all four constellations (GPS, GLONASS, Galileo and BeiDou) and three frequencies (L1/L2/L5), we will set the baud rate to at least 57600 (bits per second) and ideally 115200 baud. (If using the optional serial port to connect to a radio modem, please ensure with your supplier that the radio can support these higher baud rates.)
Click on Connect to launch the search for your Arrow on the selected (USB or Bluetooth®) COM port.
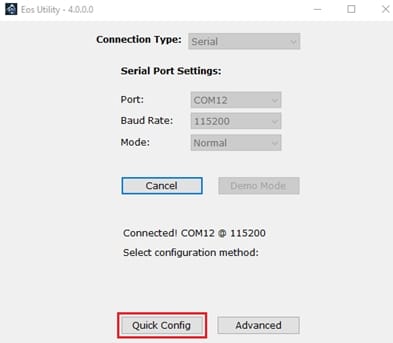
In the images shown below we are using the Bluetooth® port to connect to the Arrow and, since the baud rate of a Bluetooth® port is irrelevant, the value of 115200 has no consequence on the communication. If you are using the USB port for the first time, the default baud rate is 19200.
Once Eos Utility detects your Arrow, select the “Quick Config” mode.
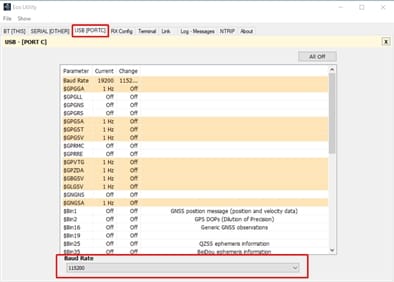
Click on the USB (PORTC) tab then select the “Baud Rate” line at the top. Then expand the pull-down menu that appears at the bottom and select 115200. Repeat if necessary, for the SERIAL port if you will be using it.
b) Send the base station config file to the Arrow
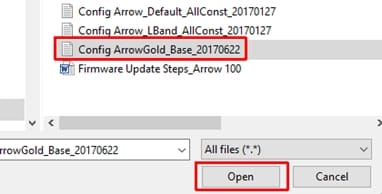
To send the base configuration file to your Arrow Gold, first click on “File/Load Configuration File” at top left corner of the Eos Utility interface. Select the Base Station Configuration File you previously downloaded from this article and click on ‘’Open’’.
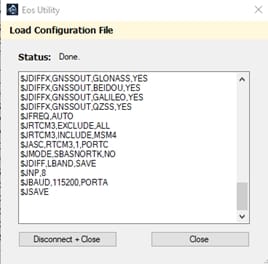
The configuration will be sent to the receiver in a pop-up window similar to the one shown below:
Once done, click on “Close”.
We will now save all these settings (new baud rate and configuration parameters) and reconnect to the receiver at a higher baud rate (if using the USB port for this exercise)
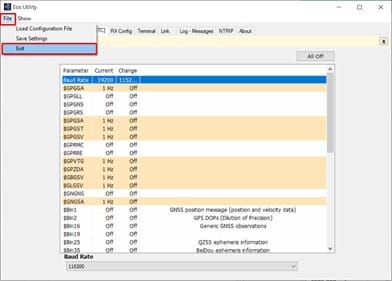
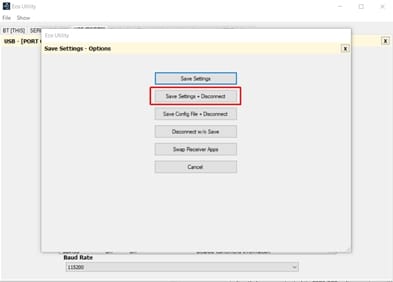
Select “File” / “Exit”.
Chose the “Save Settings + Disconnect” option. This will take you back to the initial connecting menu of the app with the new baud rate(s) saved.
Step 3: Determine the reference location/coordinates of your base station antenna, and save it to the Arrow’s memory
To start computing and broadcasting RTK corrections from the USB and/or (optional) Serial port, your Arrow Gold needs to know the location (x, y, z coordinates) of its antenna.
- If the reference location (base coordinates) is tied to a geodetic network (e.g., NAD83 (2011) for the USA), then the rover in the field (Arrow Gold receiving the corrections) will also output positions in the same datum, and all the points will be tied to the same geodetic network also. In this case, the elevation of the reference coordinates must be the Height Above the Ellipsoid (and not MSL nor orthometric height).
- If the base station coordinates are “arbitrary” (usually averaged using SBAS) then all coordinates of the rover will be within RTK accuracy with respect to each other, but the entire work will be shifted with respect to the geodetic network. The shift will be a constant value (vector) equal to the difference between the arbitrary base coordinates, and the coordinates it should have had in the geodetic network.
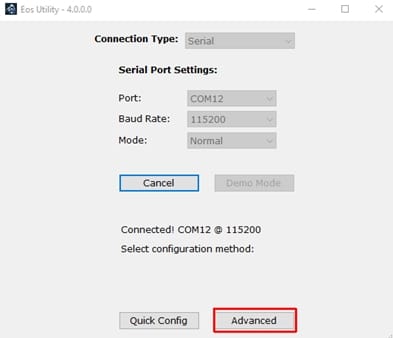
We will now connect again to the receiver at a higher speed, this time using the Advanced mode in order to set the base station coordinates.
a) Average the Reference Position from the Arrow
This method will set the reference coordinates of the base station to an averaged value. This averaged antenna location of the base will not be geo-referenced to any horizontal datum. In the agriculture industry for example, this method is often used as only the relativity between the points is needed. But if the base station is receiving RTK corrections from another base station or RTK Network referenced to a specific datum, then the average coordinates should be around 1 to 3 cm depending on different factors (e.g., distance with the other base station).
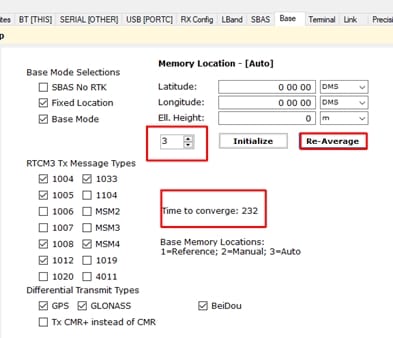
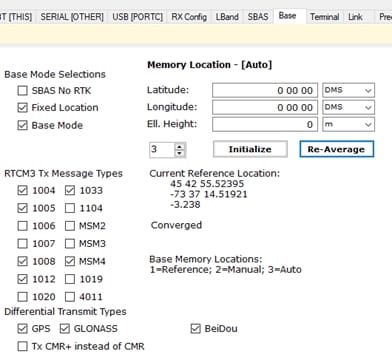
To use this method, click on the “Base” tab in Eos Utility. Set the “Memory Location” to Auto by selecting “3” in the scroll box and click “Re-Average”. If the receiver is tracking satellites and computing a valid position, then you should see a countdown starting at 300 seconds (5 minutes). Let it run until the new location appears above the word ‘’Converged’’. The computed elevation will be the “Height Above the Ellipsoid”.
If you change the “Memory Location” scroll-box to “1”, you should see that the average coordinates are now set as the Reference location of the base station.
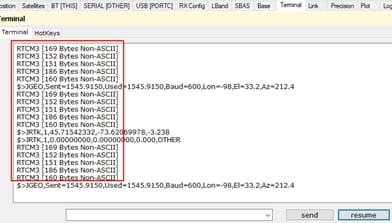
If connected to the USB port of the Arrow, you can confirm that it is outputting RTK corrections by selecting the “Terminal” tab and checking the “Verbose” checkbox.
b) Enter the Reference Coordinates Manually
This method will let you manually enter the reference location of the base station. In almost all cases, you will enter a set of x, y and z coordinates that are tied to a specific horizontal datum. This is the method used for most applications. The base station coordinates are usually determined using post-processing of the base station raw data by using online services like OPUS, NRCAN PPP, or similar. The location of the base station antenna can also be computed using conventional surveying methods (e.g., using a total station).
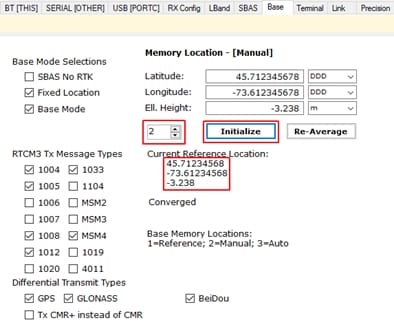
In Eos Utility, select the “Base” tab. Set the “Memory Location” to Manual by selecting “2” in the scroll box, and enter your coordinates in DMS (Degrees/Minutes/Seconds) or DD (Decimal Degrees). If using DMS, enter at least 3 decimal digits for the seconds. For DD, enter at least 8 decimal digits for the degrees.
The altitude entered should always be your Height Above the Ellipsoid expressed in meters with ideally 3 decimal digits to achieve millimeter resolution.
Step 4: Broadcast corrections (via Eos Server online or radio modem)
Here are the considerations for using Eos Server or radio modems.
a) Using Eos Server
Eos Server is a paid server software that lets you broadcast your own GNSS base station corrections over the Internet using the Ntrip protocol or standard TCP/IP. For more information about this utility please download the app and the User Guide.
Eos Server can be run in demo mode for up to one hour at a time for evaluation purposes. Please contact your Eos representative should you be interested in purchasing a license.
b) Using radio modems
When using radio modems with serial ports, there are two considerations:
- Confirm the maximum baud rate of the port of the radio from the manufacturer’s specifications
- Make sure that the cable you are using between the Arrow and the radio is a null-modem cable (to connect equipment to equipment and not equipement to PC). A null-modem adaptor might be needed.
You are now ready to use your Arrow Gold receiver as a base station.
Further Information:
If you have any questions regarding the configuration of your base, please contact your reseller, fill out our fast-reply Technical Support form, or send us an email at support@eos-gnss.com.
This article is provided for technical support purposes only. Please refer to your Arrow receiver’s product documentation for additional warranty, license and safety information.


