How to Get Started with ArcGIS Collector: Is It Really that Easy? [Webinar]
Synopsis
In this webinar — “How to Get Started with ArcGIS Collector: Is it Really that Easy?” — you’ll learn how to get started in ArcGIS Online and ArcGIS Collector. Start with setting up your ArcGIS Online organizational account, creating web maps, configuring editing and group share settings, and more. Then, the staff from the Esri water and product teams will to show you how to access and collect data in the field using Collector, from download and installation through configuring your high-accuracy Arrow Series® GNSS receiver.

Transcript
Part I: Introductions and Audience Polling
CHRISTA CAMPBELL: Hi, welcome to the webinar. I’m Christa Campbell. Thank you for joining us today for “ArcGIS Collector: Is it Really That Easy?” So today I’m really excited to welcome Jeff Shaner to our webinar. Jeff is a product manager in our applications group. I asked Jeff to join us this month because we’ve had a lot of questions about Collector, particularly after our September webinar with Le-Ax Water.
CHRISTA: Jeff is going to demonstrate how to get started, beginning with setting up your ArcGIS Online account, then building a web map, and finally downloading and using Collector. So I’m expecting a really good webinar today Jeff, no pressure anything.
JEFF SHANER: Thanks Christa, yeah no problem.
CHRISTA: So David Totman is going to actually get us started. You all know David. He’s our industry manager for Water. He’s going to have a short discussion about how ArcGIS for Collector is transforming organizations with functionality and efficiency. So, let’s just get started David.
DAVID TOTMAN: Thank you, Christa. So yeah, just a real quick intro here just to kind of reflecting on the year. I’ll be pretty quick. Then, again, we’ll turn it over to Jeff to get started.
DAVID: But I think, just so Jeff and I kind of know the audience here, I’m going to have Christa start us off immediately with two polling questions. That sets the stage for us [to] know who’s out there. So, Christa?
CHRISTA: Sure, David. [To] start with our first polling question, describe your current environment:
- Are you using Collector for ArcGIS already?
- Are using ArcGIS Online but you haven’t implemented Collector?
- You’re not using either ArcGIS Online or Collector.
- Or, you don’t know.
DAVID: Okay, so it looks like it’s somewhat evenly split. Between those answers, only a few of you aren’t sure. So, Jeff, I hope you’re paying attention. We’ve got about 37% saying they’re using Collector. All right, thank you, you guys, we’re going to close this. And then right into the next one, Christa.
CHRISTA: Sure, so our second polling question is: If you are using Collector — so that’s for those 37 percent of you — how would you rate yourself”
- Advanced user
- Moderate user
- Or you’re just getting started
CHRISTA: Okay great, it’s looking pretty good! We’ve got about 70% saying they’re just getting started. So this webinar is going to be awesome! Hopefully Jeff’s presentation is going to be very useful for you. We’re going to close this one question. Back to you David.
DAVID: Okay, thanks Christa. So yes, this is great. [For] those that are just getting started, there will be lots of great content. But even for your advanced folks, I find that whenever I sit down and have a chat with Jeff, I always learn something new about the product — even though it’s been out quite some time. So it’s really what I want to talk about; this is why we’re gathering here in December as well. Hopefully have a little bit of fun here at the end of the year. But as we’ve gone through 2016 and every conference we go to, every customer site, we’ve been seeing this transformation with Collector.
DAVID: And a quick little history lesson, I mean, [Collector has] definitely evolved since it was first released. In the beginning, it could collect points and everyone’s like, “Oh, yay.” But it obviously quickly evolved much faster.
DAVID: It’s been going in the lines and polygons — but disconnected really that was the thing that really started taking off. As people could finally see how easy it was to go disconnected — to download your data to the phone or whatever — and go just collect your data and then synchronize [it back at the office].
DAVID: But [even] then people weren’t satisfied, and [so] what really then launched a second wave than, was those related tables, which just launched the inspections. So that really just opened up the door and allowed people to do exactly what they wanted — like hydrant inspections, things of that nature.
DAVID: And then folks weren’t satisfied and wanted even more. That’s when the companion app started to come out with additional functionality — with navigator and workforce, and what-have-you. And then really, as Christa [said when she] opened the session here, we had Le-Ax [Water] on and talked about the high accuracy. Now that’s really taken off.
DAVID: So we really we just had a ton of conversations. That’s why Jeff’s here today. A lot of folks have talked about how successful they’ve been with Collector, but again, there’s always that little nuance, there’s always that little button to push, that little configuration that really enhances what’s going on. From a process / efficiency piece, that ease of use and cost-effective[ness], I would love to say, “read my lips.” But you can’t, because it’s webinar.
Part II: Evolution of ArcGIS Collector
DAVID: So we talk about going from easy to hard, and then going from points to high accuracy. We’ve just had this escalating functionality. And so, with respect to that ease of use and costs, it’s — for those who are using ArcGIS Online and Collector — you know how cost-effective it is. But from the ease of use, what’s been resounding has been [that] everyone gets to use it on their phone. That’s really changing the whole handheld market, especially with some of our high-accuracy folks that are saying, “The trainings nothing because everyone’s using their phone.” And this app is designed as a phone app or tablet app, the training is literally 15 minutes and folks are off and running, although results may vary. Because it’s quite intuitive.
DAVID: But I think that’s one of the most exciting things, is folks have also said, “Esri, you finally got It, right. You finally made this thing that all of us can use. You don’t need a GIS degree to get out there and start collecting data.” With all that being said it’s definitely professional grade, so we see this being used within the water utilities and the water resources.
DAVID: A lot of the water resources folks like the fact that they can go offline because, let’s face, it when you’re out in the middle of the watershed somewhere, there’s not much cellular activity. So you can definitely go offline.
A lot of the water resources folks like the fact that they can go offline because, let’s face, it when you’re out in the middle of the watershed somewhere, there’s not much cellular activity
DAVID: For high accuracy, if you have really good photography sometimes you get pretty accurate with you with your thumb or stylus. So it’s really been an amazing year with Collector. It really has been transforming utilities. I think we finally kind of knocked it out of the park with this one: An application that plugs right in as the whole web GIS [and] web maps, [with] people able to configure, and [with] ArcGIS Desktop. [Now you can] roll something out very quickly. [So this] has transformed a lot of folks’ mobile strategies.
DAVID: So anyway, probably enough of that. I want to turn this over to Jeff and let him get started. But it’s just been a pleasure talking to all of you folks this year. I’m looking forward to getting to the Q&A piece. So, with that Jeff I’m going to turn it over.
JEFF: Thanks David. It has been a pretty busy year for us, and thank you for having me in this webinar today. Hopefully given the polling results that we saw, that the information here really helps you along in the process of deploying Collector in your organization.
JEFF: So what I wanted to do is first kind of set the agenda with a few slides. I think one of the things that kind of brought this webinar to life was a story that we shared with Travis Anderson from Le-Ax WateR District, where as you mentioned, through the evolution of our releases of Collector, one of the key new functionality pieces that we added in this last release was the ability to connect to external GNSS receivers. This is a picture of Travis actually marking fire hydrants using Collector with an Eos Arrow GNSS receiver connected to Ohio State’s RTK Network. [With that, he is] able to collect that with extremely high accuracy [data]. What’s really cool about Travis is that by trade he’s an engineer and he uses GIS kind of as a sideline, and he found Collector pretty easy to pick up and use. Christa and everyone here today did a webinar with them recently, and you can go and watch that webinar to see his experiences as well.
What’s really cool about Travis is that by trade he’s an engineer and he uses GIS kind of as a sideline, and he found Collector pretty easy to pick up and use
JEFF: But let’s talk about how to get going with Collector. When I first talked to Christa and David about this, they actually said, “Can you set up an ArcGIS Online organization?” [And I said,] “That’s just crazy! You guys want me to do that in a demo?” So, okay we’re going to do that today. We’re going to try to anyway. And secondly, [we will] show how to create a web map, do something from scratch, and then show how to download and use Collector on a device. So we’re going to try to go through all those. I’ve got some slides to follow up, in case we crash and burn at any point time. So let’s try to jump in and do that first demo of setting up an ArcGIS Online organization.
Part III: Getting Started: Setting up an ArcGIS Online Organization
JEFF: What I’m going to do is I’m going to flip over to a web page here, and you’ll notice that the URL it gets you to the evaluation of ArcGIS Online. I’ve tried to fill this out already with a bogus Gmail address that I created called “Esri Water Webinar.” Confirmation for that, a user name, water webinar, and I set my industry. That’s also very important because [Esri Marketing Specialist] Maria [Lamas] and Christa can track that and see who in what industry is actually setting up trial organizations. So when I click “Start trial,” what that’s going to do is, it’s actually going to send me an email. And I’m going to go over to another tab in my browser where I’ve got that a Gmail account, and in came the activation email. So if I click on that, you can see a link to go and create my new ArcGIS Online organization. I’m going to click on that activation link, it is going to ask me for a username — this is the administrator username that we’re going to login to — and it’s going to be the one that we’ll talk about in a little bit that controls everything we do in our organization. I’ll call it “Esri Water Webinar.” And let’s give it a password called “water dot webinar one water dot webinar one.” I’m going to change it after we’re done. And then we need to give the organization a name. I’m going to call it “Esri Water Webinar,” because I’m so creative. And [for] “What city were you born in?” we’re going to say Redlands, California. That’s our security question. I’m going to accept the “Terms.” Of course, if I were you, I’d read all those terms, but I work here, so I figured I can just accept them, right? And I’m going to create my account. And that’s going to go off, hopefully, and create our new ArcGIS Online subscription.
DAVID: And Jeff, that’s the email that when I talk to people and say, “Well, you’ve got ArcGIS Online.” They’re like, “No we don’t. We’ve got ArcGIS Desktop and ArcGIS Server, but we don’t have ArcGIS Online.” And I say, “Well, yes, you do. Because of our entitlement program, every account does.” That’s the email that a lot of people can’t find in their inbox. Or [maybe] it went to Joe, and Joe doesn’t work here anymore. So that’s that one email that really starts the game.
JEFF: Cool! All right, so we have our organization name. Now it’s called Esri Water Webinar, and we need to give it a short name as well. So I’m going to just be even more creative and call it “Esri Water Webinar” again. You can see, as I filled it out, underneath it’s building a URL, and telling you whether or not that actual short name is available.
JEFF: Now ArcGIS Online just updated last night, and they did a significant change that you can actually change that organization short name now if you want. So if you’re not happy with the name that you give it, you can go in as an administrator and change it if you’d like.
JEFF: The next step is to setup browser language, or, sorry a language for the for the organization — a default language. I’m just going to use the browser’s default, which is going to be English. Also, a region. For the region, I’m going to say the “United States.” Then you choose the method of security that you want to use. If you’re new to setting up ArcGIS Online, I would ask you to really think hard about this one. The default setting is to “allow HTTPS only.” I would encourage that, because that’s the most secure way to store and manage all the information inside of ArcGIS Online. And, that becomes the transport protocol for your use throughout the platform with it, so we can add a contact link if you want.
JEFF: We’re not going to do that. We’re going to save and continue. And this is going to configure our ArcGIS Online organization. There we are. Now, you’ve got a little choice: You can continue, or you can go get them out. We’re going to show you getting the apps in a little bit, so I’m going to tap “Continue with ArcGIS Online.”
Part IV: Getting Started: Using ArcGIS Online with Groups & Permissions
JEFF: What I wanted to do next is kind of navigate you a little bit through ArcGIS Online before we get to the next step. So you can see at the very top of our subscription that we just created our ArcGIS Online organization: a set of tabs. We’re sitting on the “My organization” tab. If you’re an administrator of an organization, like we, are because we just created this, you have additional privileges. You can edit the settings, so you can change some of those things we just did. But you can write members of the organization, so we can add users. They could be your field testers that you want to add. You can use “Status” and other things.
JEFF: You can also “Manage License.” So part of your subscription and your trial, as well, is the ability to get trial licenses of other applications, like ArcGIS Desktop or ArcGIS Pro. And you can manage them directly from here, and give those licenses to certain named users. If you move across the tabs — I’m going to skip “My Content,” because we’re going to come back to that — and I’m going to click on “Groups.” I’m going to highlight the things that are really important for you as a Collector user or [if you are] deploying Collector. There’s much more to your ArcGIS Online organization than what I’m going to show you today, but we’ll just highlight the key points.
JEFF: Groups are important because that’s the way that you share maps for use with your field workers. And inside of ArcGIS Online, I can create a new group. I’m going to click “Create a Group,” and I’m going to give that group a name: “Field data collection.” I’m going to add a great summary: “This is for Collector field users.” I’m going to copy and paste that, give it a meaningful tag, hopefully, like “ Collector rocks.” Then I can choose the status of this group, and [this is] really the permissions for people to see it. That could be public, meaning that other users inside of your organization can look for it, see it and ask to join it. You can [also] make it private, so if you don’t want to share that with Christa or David, you don’t have to. They will not be able even to see it, so there’s a lot of control you have over that group.
JEFF: And you can control the access of who can update information in that group, too. So if you want to just lock it down so that only you can add content and be a contributor, you could do that. Or we, in the context of sharing, we’re going to make it available for everyone.
JEFF: The other thing that I wanted to do is, I’m going to go and click on next to the name where you can set an icon. I’m actually going to browse up a bit. I’m going to “Choose file,” and this is going to browse my file folders. It’s [going] right into a folder that I’m going to talk about in a minute, where the whole set of icons would have been created for you to use. I’ll click this field operations TMG file. And if I click “OK” and then “Save,” now we’re going to have this new group, and it’s going to have this wonderful new field data collection icons.
JEFF: I’m going to pause the demo part right now, and I’m going to go back to our slide here and talk a little bit about what we just did. So what we did was we went to the trial login page and the free trial page, and we entered in our username, email address, and our industry. Then we followed a bunch of stuff.
Part V: Setup Summary & Tips for Managing a Mobile Workforce
JEFF: But I wanted to point out that there are some learn lessons for how you can set up an ArcGIS Online organization. We’re going to share these slides out afterwards, so you can click on the link and get at all of those details. There’s also another one lesson — that’s really about managing a mobile workforce — that talks about those groups [and] how to set up maps. I also wanted to mention some key tips for success that I’ve seen from the customers I’ve talked with.
JEFF: One is to find a sponsor. So if you’re a GIS manager in your organization, what really makes you successful, from a deployment perspective, is finding that field user that maybe is more willing to take on using smartphones or tablets in their day-to-day work. Really try to bring them up to wanting to be the sponsor for you. Find a project that isn’t necessarily on the critical path for your organization, but adds key business value. Make sure to align with your IP folks if you’re not in the IT group already, especially if you want to leverage data within your organization. [This is] what we kind of refer to as a “hybrid mode” where you’re using ArcGIS [for] Server [now called ArcGIS Enterprise] and ArcGIS Online. You’re going to need to get adoption of mobile-device access inside your organization.
JEFF: And don’t try to tackle all your problems at once. Take baby steps and learn from those successes and failures. You’re going to have both along the way. So just a few quick tips there.
JEFF: Next thing I wanted to talk about that in the steps that we did — I went too fast — was that we signed up from the email. We’ve clicked on that confirmation link. We created the administrator username and password. I didn’t go through the process of creating a bunch of named users [because] I figured that you can sort that one out yourself. There are a bunch of different ways that you can do that. Now then we’ve set up some of the basics, I would say the most important thing that we determined was both the short name and also the security access. I think you don’t want to really go flipping around between HTTP and HTTPS for security. But you can go and change that within your organization. It has some ramifications if you do, but what I would say set it up first. And that’s maybe where you want to talk to your IT folks about it before you move any further.
JEFF: So in your organization, you can invite members. I went through the administrators’ user experience. And linked into this slide is how you can go and understand the different methods of inviting members.
JEFF: So important to know about Collector and ArcGIS Online is that is it has its own user store. But it also can connect to what we call “enterprise users,” meaning that you can use your own Active Directory and use users from that directly inside of ArcGIS Online. So if you want to do that instead of manually creating users or loading them from a text file, you can do that.
Part VI: Managing Groups, Items, and Users in ArcGIS Online
JEFF: The way that you organize content is through groups. Everything inside of ArcGIS Online, we refer to as an “item. Items are shared using groups. So the web maps that we’re going to create — the layers that we’re going to create — everything within the web apps you create are considered “items” inside of ArcGIS Online. It’s a way of indexing things inside of the folder structure that’s stored in the cloud. You can monitor usage; that’s something that’s not commonly known, but as an administrator, you can go in and look — at what users are using, what applications, when they logged in last — and get a sense of your adoption. There’s much more you can do there as well.
JEFF: Now when I created the group, I wanted to mention this because there’s a lot more to it than just that, but as a tip, you can see that there’s a model organization for water utilities. You can download that using the link that’s provided. That has home screen banners that you can use. It has the icon, like the field data collection group icon that I used, and much more inside of it. So I encourage you to go and download that model organization as well. It has a lot of really valuable content inside of it.
JEFF: Ok, through the groups — I mentioned this already — that’s how content is shared. You can create groups — everyone with a named user that, again, ArcGIS Online updated last night. So for those of you that already have organizations, you’ll see that a new level of licensing came in this morning. It’s called “level 1” and “level 2” licensing. Level 2 is what, today, is a named user. If you’re already an existing user, a level 2 license can create groups that can create new content. [For] level 1, think about it as a viewer-only role. So you have that control now, if you want to just have viewers inside of your organization that don’t actually add or contribute content. You can create new users using that level 1 role.
JEFF: If you want some tips, create a dedicated group for field data collection — all the users that you have in the field, like your sponsor, and others. You share into that group as well as the content that you provide, and I’ll show that to you in a minute.
Part VII: Adding Content to a Web Map in ArcGIS Online
JEFF: So let’s move over to the “My Content” view. Let’s go to the demo and use this slide as a recap. So back over to our screen in ArcGIS Online, where we created that group, I’m going to click on “My content.” And what we’re going to do is, we’re going to create a new web map and a new web layer for use and collected right from scratch.
JEFF: This is very well advertised, but actually, inside of ArcGIS Online we have a whole suite of templates. If I am in “My content” view, it’s kind of like your folder view on your file system. I can click “Create feature layer.” A feature layer is where you house all the features that you collect out in the field. You can see there’s a bunch of categories by different industries. There’s quite a few different templates in here. I’m going to click on “Water utilities,” and you can see even in the water utilities vertical, we have a lot.
JEFF: So the one that I’m going to create from, we’re going to call “Watering violations.” We’re going to click “Create.” There is one layer inside of it called “water restriction violation.” We’re going to define an extent. Since we’re out here in the LA area, we’re just going to drag a rough box around that. Click “Next.” Give it a name. [We’ll] call it “CA water violations.” And it pre-populates some information for us — some tags help us find things in a summary view [for instance]. And it saves it into a folder. I’ll get back to that in a second.
JEFF: Now, when I click “Done,” what it’s going to do is, it’s going to go create a new hosted feature layer inside our organization. That layer is the foundation for all of the data types that you can collect in the field that are specific to water violations. When that creates, it’s going to give us the details of that item.
JEFF: Now I’m going to click back on “My content” before we look at that a little bit more. You can see there’s a concept of folders. I can create new folders. I’ve got this base folder structure for me, as a named user, and I can organize everything I build into subfolders that are within that main folder. I just want to point that out now this is that new item that we created. It sees a water violations. if I click on it, it’s going to open up those details back to where we were. There’s no data in it yet, but there’s some key things that I want to point out.
JEFF: First, you see that well clearly it has a thumbnail that you could modify if you want. And like I mentioned earlier, the model organization has a bunch of icons if you want to spruce that up. Also you get to the layers within. There happens to be one layer here: It’s called “water restriction violation.” Some really important things to note about it.
JEFF: One is that you can enable or disable attachments, or the way that you can capture photos inside of Collector out in the field. So if we want to document the violation with a photo, then we’d want to enable attachments. By default, this template has them already enabled for us.
JEFF: Likewise, there’s a bunch of settings. So if I click on the “Settings” tab, there’s a bunch of things in here that apply to Collector. A good one as a rule of thumb, especially if you share in a group where you let anybody access it, is preventing it from being deleted. Because with all your data stored there, you don’t want somebody to delete it. So you can protect it by deleting that or by preventing that web layer from being deleted.
Part VIII: Enabling Editing Settings for Collector in ArcGIS Online
JEFF: The other thing that’s really important here is the settings on the future layer itself for editing access. These are all adhered to by Collector. So if we want to enable editing, which of course we do — that’s what we’re going to add features into — you can check that. Check by default. If you have additional layers you don’t want to be edited, you could disable it, and you can be using them in Collector.
JEFF: You can also keep track of who created in last updated features. That’s really key because it actually stores — with every feature that’s captured in the field with Collector — who captured it or who updated it, when did they collect it, when did they update it. So you have this audit trail on your features based upon who the editor was.
JEFF: Then you can actually control the type of editing. So if, for example, I only want people to add new features, they could never modify an existing feature that somebody else created. I can change those settings so that the type of editing makes the form is really restrictive. We could also choose to determine what features editors complete. I’m going to leave that to all editors on changes back, so we can all update it. What features can editors edit? Can they edit all features or features that they own? This requires that tracking setting. But we’ve got who’s edited what, so now we could say, “Well, Christa could only ever edit features that she created, and she can’t edit ones that I create, because I don’t want her touching my features.” You can also change the access control so there is an offsetting side.
Part IX: Syncing Offline Data with Collector in ArcGIS Online
JEFF: The one last one I wanted to mention was sync. That’s important for offline map use. So if you want to take maps offline inside of Collector, you’re going to need to enable “Open sync capability.” Let’s go back to the “Overview” for a second. There’s additional features in here. We’re going to just focus on those for now.
JEFF: If you’re already an ArcGIS Online user, one of the really cool [updates] that came in this morning — or late last night if you were up late — is “Create view.” That’s to give you different representations, different editing control over views of that service. But that’s something you can explore. We’re going to try and keep this one a little more simple.
JEFF: So I’m going to open in the map viewer. And I’m going to show you how you can further tweak some of the settings inside of a web map, because we need to create a web map for use with it Collector. Here’s the layer that got added. Of course, there’s no features because this is just a template. You can see what we call that the feature templates, or feature types, and that’s based upon the way that that layer was structured.
JEFF: So one of the things we could do is we could simply rename that layer. If we want to call it “Violations,” we can do that. And we can change the — what we call the — “pop-up details.” A pop-up is really the form representation inside of Collector. There’s a title. That titles reflected in Collector. When you tap on an existing feature that might have already been created, you’ll see a quick tip that gives an attribute value. And you see all of the attributes. You also see this checkbox to “show feature attachments.” That’s the photos that you collect. So you can see those pop up.
JEFF: I’m going to click “Configure attributes.” By default, when we created this template there were all these fields created for us. And there’s a display capability and an edit capability. All these are reflected inside a Collector. So if you’re wanting to control what they can visually see for different fields and what they can edit, you have that level of control inside of there.
JEFF: Also there is a field alias, which you can go and change. So if I wanted to change violation type and have that reflected when they see the form, I can do that. I can also provide a hint, so it contains that violation type, to enter violation type, and that will show up inside of Collector. Try to remember to point that one out. The edit attaching fields are disabled. You can see if they’re all here. They’re not ones that you edit or really visualize much inside of the map, but they’re stored as part of it. And you can make use of them. So I’m going to hit “OK.” And I’m going to hit “OK” again. Now we’ve got that web layer that we’ve added.
JEFF: Note you can change the base map, and the base maps change the way that you reference information in Collector. We’re going to go with a satellite imagery reference. We can also add bookmarks. So what I’m going to do is, I’m going to run a search for our building. Collector our campus live into it, and I’m going to create a bookmark. There. I’m going to call it “entry campus.” All right. I’m going to zoom back out to the little area around “Kaitlin Empire” fell for you and then I’m going to hit save and I’m going to give this our name. I’m going to call it “our awesome violation map.” I’ll give it that nice “ Collector rock soup,” “Collector rock tank,” and this is for mining violation. Oh totally oh that’s where all the violations are going to happen.
Part X: Sharing Web Maps with ArcGIS Online Groups
JEFF: We save that web map. Now the last thing we’re going to do with it: We’re going to share it because we want to be able to put it in the group so that everyone can access it. I’m going to click on that, and you can see it popped up. It also wants to update sharing on another item, and that’s the layer that we created. So it’s really important that if you’re not only the map, but all the layers that are referenced side of it, so that everybody who is part of that group has access to all the content within it. Update the sharing of that layer.
JEFF: Now, both are going to be shared in that group. We come back to the group’s page. You’re going to see in our field data collection group, we’re going to have two items in there: Our awesome violation map and our web layer. So there they are. They’re shared in that group. Anyone who is a part of that group can access that content. Right now it’s just us. We didn’t we didn’t create any users. But also in the group details you can invite users to it, so that you can just have at it and play with that as you see fit.
JEFF: Let’s go back to the PowerPoint again and recap. So we talked about the “my content” view. We showed you how all of the content that you create and stored inside of your local view of the system. The other thing that’s interesting to mention, that I didn’t put on the slide, is that as an administrator you kind of have superpowers. So I could go and — if Christa created some content and I want David to own it, because we decided that we’re going to fire Christa (nothing we would ever do! Christa, we love you), but the web GIS actually transfers all of her content over to David before we nuke her out of the ArcGIS Online subscription as a user.
JEFF: So some tips again, like I mentioned very simple: You can use these templates to create layers from scratch, go to the field, do some simple basic data collection. You’re offering a map. There’s a lot of details in a map that you come in here inside of a group . So let’s go through this those other details.
Part XI: Hosting Web Maps for use in ArcGIS Online
JEFF: There’s one thing one other thing I wanted to show you that I forgot to mention when we created that feature template. First off, we went through the templates — whether they’re inside of ArcGIS Online — there are other ways to create content inside of ArcGIS Online. And I don’t know if we’ll get to it, but I do have a bonus slide about that, and that’s really about how you can use ArcMap to take existing content you manage — say in a file geodatabase — and publish it up in a very simple process for doing that. We call that an internally kind of a by reference to a GIS server.
JEFF: So say you don’t want to host it inside of ArcGIS Online. You want to leverage it with your own ArcGIS Server. You can do that as well. Again there’s a lot of content and tips for that in the water solution templates that are also available for download and link to here. We’ll talk about relationships in a little bit as well. Relationships are important.
JEFF: When we created the water violations layer, we talked about the details — the item details and photos — being something that are part of attachments to a layer. And I’ll show that, hopefully, when we get into the ArcGIS Desktop side. But in the geodatabase, you can create attachments. These are the data type that stores photos in are recognized by Collector. [For] editing control, the access, the tracking, the sync — all very important. In fact there are advanced settings for the sync as well, so you can control the synchronization. For behavior I won’t get into a lot of detail about that. But think about it: kind of like your email, if you’re offline, but you’re still working on your email, you can great new email on your phone. And then when you land, you can — if you’re Christa and the plane just touches ground you’re not even to the gate yet, and she’s off of airplane mode, and working on her email — what happens is that not only does it send your email that you created. But it also brings down any other emails that were created. That’s the default behavior with sync.
JEFF: Now imagine you’re out in the field, and you’ve got a very low connectivity. You’re just a [data] collector. All you do is contribute new content. Well, you can have finer-grained control, so that all you do is upload, and you never have to download everybody else’s features. That gets really important when you’re dealing with photographs, because photos can be quite large, and you only want to update the things that you collect. You don’t want to pull down everybody else’s photos. So look into the sync details: There’s some “Advanced Settings” there that you can get at now. And those behaviors are actually on the web map. We’ll talk about that a little bit.
Part XII: Configuring Advanced Settings in ArcGIS Online
JEFF: To map properties, we showed you the bookmarks and the base map. There’s also the one thing I missed showing you that I wanted to show you. This is the application setting. So we’ll go to those map item details, and I’ll show that that’s where you find also the advanced offline mode that I was just talking about.
JEFF: There’s other layer properties like “renaming.” And I didn’t set a scale dependency, so if we only want those features to show up on certain scales, we could do that. And also the form visibility of fields, or the order — you can all adjust that in the pop-up. So if you’ve got a certain order on your feature class — if you’re inside of [ArcGIS Desktop], you can even reorder that in the map representation and ArcGIS Desktop.
JEFF: But you have a further way through the pop-up to organize and modify your content. Before we get to downloading and using Collector, let’s just flip back over to this one more time to show the details of the web map — that piece that I actually missed before. So if we go to those details and you can see it shows our layers and the folder it exists. All of that wonderful stuff.
JEFF: But if I go into the settings view, we have those advanced offline options. Maybe I want a little more fine-grained access to what can be downloaded, what could be synchronized, whether or not for read-only layers I want them at all, or whether I just want their attachments, and whatnot. The other thing I wanted to mention is that in the application settings area, you can actually control feature functionality inside of Collector. So if I don’t want anyone to change the basemap, I can turn that off. If I don’t want it, you want to use the routing capabilities, or the measure tool, I can do that. I could also add a different search capability by default, and set up a “search addresses.” But if I want to search against attributes and layers, like a facility ID or a hydrant ID, I could do that by adding a query capability into the search. So I’m just going to turn back on the base map, select “risk,” and see that.
Part XII: Downloading Collector
JEFF: I’m going to save that. The next step, which you got a hint to with the slides, is that we’re going to download and use Collector. The first thing I wanted to mention is that Collector is supported on your iPhone®, your Apple device, on an Android device, and on a Windows 10 tablet. You’ll notice that this, for stores listed here, are not just the three in the last three platforms. And that’s because certain Android devices aren’t necessarily certified for use with Google Play. A good example of that is a high accuracy receiver from, like a Compass II, it doesn’t have the Google Play Store on it, so you can actually download the Amazon App Store on your Android device. Collector is in the store there. You can search for it, get the application, download it, and install it. You want to install from the store, so that you can get the updates that are coming from us. By the way, Collector is going to update with version 10.4.1 probably tomorrow. We’ve got another release that’s coming right away here.
JEFF: Then inside of Collector, you can sign in on the device with that username that you created.You can discover the map. So let’s try to do that; let’s see if I can remember it.
Part XIII: Locating a Specific ArcGIS Online Web Map in Collector
JEFF: So here we have my iPad®, and you can see I’ve already searched in the store. I really wanted a download, but we’re going to do Collector instead. I want to tap on the button for Collector to download it. Hopefully this isn’t going to take too long to download. Click your small app, and that’s downloading it directly onto our iPad. Then we can open it up.
JEFF: The other way that you can deploy applications is through a mobile device management tool. If you have that in your organization. That’s where it comes to talking to your IT staff. They can download it to their mobile device management system, like MobileIron or Citrix, and then deploy it out to devices so the mobile workers don’t have to load it.
JEFF: All right. It did download, and you can see the very first time we open it up on our iPad — and it’s a similar experience on Windows 10 or on Android — you see that you have the option to sign in with ArcGIS Online or with Portal for ArcGIS. Portal for ArcGIS is like taking ArcGIS Online and putting it all within your organization, on premises and behind your firewall. Then you can fully control the deployment of users that way and also content. Also at the very bottom, there’s a “try it” button. So if you haven’t gotten to the point of creating a trial organization, you can click the “try it” button. We’ve got a set of web maps that you can go and play with and create new features into.
JEFF: I’m going to tap ArcGIS Online. I think I called [our map] Esri water webinar. You guys remember what I called it; you were paying attention right? Just watch, I got this wrong I bet. It was “water dot webinar.” Cross my fingers. And there you can see. You can see that what it did was, it signed in. We happen to be the one that created this map, but if we weren’t — if we were other users — we would see the maps that are shared with us. You see there’s a button on the top left. This is all map and then it’s also showing “my maps” so those are maps that I’ve created in my user account or the group. You click and they’re all going to show the same, because we’ve only created one thing. There’s also a toggle between “all” and “on device.” So you will see that if I download, it mapped to my device/ I can quickly toggle between maps that are accessible on a connected way, and those that are local to the device. If I tap the “download” button, that gives us the ability to download the map to our mobile device. And inside of here, you can choose your working area — the area that you’re going to go out and do, edit into, or new collections into. ANd that cyan box actually controls whether or not you can add a feature, so that features outside of that box is not once you create it.
JEFF: There’s a second concept, which is the map detail. That’s really around the base map, and there’s ways to optimize this as well. But by default, it’s showing you one scale — the base map. If I start to zoom in, I can get more detailed content. What you see at the very bottom — the estimated size starts to go up. That’s showing you how much data is actually going to be downloaded. That’s your device. A tip on that is, it’s really relative to the work area. Think about doing this before you go out in the field, the free basic basemap.
JEFF: Also I wanted to tell you that if I keep going in, then at a point, I’ll hit “this exceeds tile limit” and reduce the area, or the level of detail. If you’re using Esri basemaps, that equates to what we call “a hundred thousand tiles,” which is roughly two gigabytes in size. And so is the maximum size it will let you get to, because that payload, the downloading to your device, is pretty large. And it’s large on our servers as well.
JEFF: Now you can use your own servers host your own content and download through this experience, if you want. There’s the concept of “hosted tile layers.” You could publish them up and do that. But for this purpose I’m actually not even going to download. I’m just wanting to show you this experience. We can decide those base maps as well, if you want to copy over large map.
Part XIV: Collecting a Feature with Attributes in Collector, Including with High Accuracy
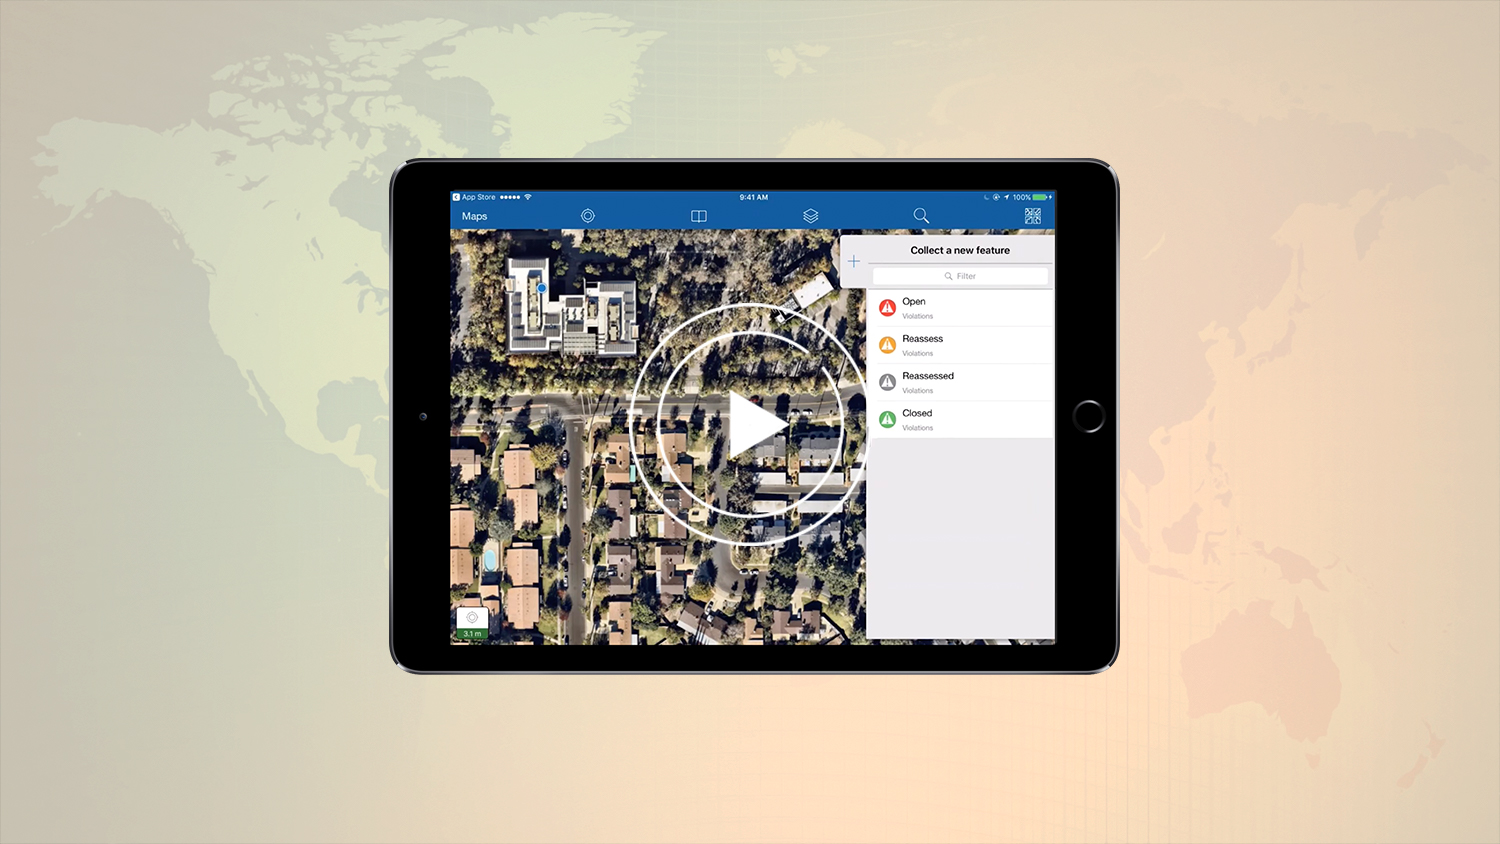
JEFF: I’m going to tap and open up the “water violations map” and then collect a feature. Now we’ll do this pretty quickly. So it showed our current location here. We are on the Esri campus. Hopefully we’re not violating the water restrictions of the city of Redlands. So let’s instead — oh and I wanted to point out, here are the different ways to collect data in this template. These are the types that we could collect.
JEFF: There’s open violations. Now, that’s controlled based upon the layer that you publish. Now, if I don’t want to collect exactly where GPS position is – of course, if you’re doing high accuracy data collection you’re going to want to do that — we’re getting — you can see on the bottom left, is a GPS button showing — we’re getting about three meter accuracy with the GPS.
JEFF: Now we can connect to an external receiver like Travis Anderson did, and get that down to the centimeter level — if we want to connect to an RTK system. But we’re going to just use the map itself. So there’s a couple of things I can do.
JEFF: First I want to choose the type of feature I want to create. This is a new open violation. We’re going to take your current location by default, because really when you’re out in the field, you should be collecting where you’re at. But you could override that if you want. I can change it to be a point on the map if I cancel this, just to show you another tip. I could just long press here and, from the action buttons, they collect here. So if it was a location that wasn’t near where I’m currently at, I could always tap on the map and start my collection that way too, and it’s got the location set.
JEFF: Now I can enter in all the attributes, like the property type, in here. Now the layer was built with what we call a “coded value domain” set up here as a pick list. You can author those inside of ArcGIS Desktop if you want. I’m just going to set one of those attributes.
JEFF: The other thing that you can do, and we don’t need to go through and set all of those attributes. The other thing you can do, and you’ll notice, is at the very top, next to the “cancel” button, there’s a little gear. That gear is looking at your required accuracy. So if you’re using GPS, you want to set a required accuracy. You can do that if you’re capturing line or area features. You can also stream positions using the GPS, and you can change the streaming interval to be whatever you want as well. You can control that accuracy there in either in metric or in imperial units with a setting inside of Collector. We don’t like working in the metric system. I don’t know why you would. I mean most of the world does. Then you can change it. All the settings in Collector go against imperial unit abroad also. You can tap that camera button and, because we had attachments, you can take a photo. So who’s going to be the lucky candidate? I think maybe David! There we go. Take a picture, David.
JEFF: We’ll use that photo, and your pics on me, so good job. I could take a break there. I don’t have to “submit” button, and hopefully ArcGIS Online likes the picture of David. Looks like it did. Surprise! Now that’s back inside of ArcGIS Online.
Part XVI: Configuring Settings for a High-Accuracy Receiver
JEFF: The last thing I wanted to show you inside of Collector — and there’s much more to Collector that we’re not talking about you can discover — is that “settings dialog.” And inside that settings dialog, there are a number of things there. One is what I talked about already, with the units of measurement being imperial or metric. We talked a little bit at the very start about GPS, and there are a bunch of settings around GPS. The accuracy is one of them.
JEFF: An interesting one is the provider. The provider is the integrated receiver because that’s all I have right now. But I could Bluetooth to an external receiver like Travis did. And I do that by hitting the “plus” button. Then it’s going to go try to discover a Bluetooth connection, which it’s not going to find. That’s why the screen is going to be blank, but if I had something Bluetooth, it would find it the other thing. That’s interesting about it, is antenna height.
JEFF: So if I click the “edit” button on this, I could actually edit this antenna height. If you’re really doing high accuracy and vertical is important to you, you can choose to set the antenna height.
JEFF: The other thing is a location profile. The location profile is really useful if you’re using an RTK as a correction source. That’s probably going to be an AD83. If you’re working in the United States, your web map’s probably going to be in WGS84. So if you want to do any high accuracy collection, you need to set a datum transformation, or else you’re not going to have accurate data.
JEFF: Okay enough about Collector. I probably went too deep on that. Christa’s giving me the look.
CHRISTA: Oh, Jeff, we’re pretty much very close to being out of time, but I know this is a lot of good data, and I have to probably ship a little more than it’s been an hour allows. But I noticed the questions coming in during the webinar. Many of them you answered as you went through these demonstrations, and your slides. One thing I would like you to spend a minute on if you would, is a related table. So I had a couple questions come in even previously to this webinar, earlier in the month, and a lot of people are interested in that: related tables. I’m going to give you just like two minutes.
Part XVII: Relating Tables in ArcMap
JEFF: Sorry I kind of get carried away. You’re going to kick me I’m like, I’m get too excited about Collector. Cool. So here I am in ArcMap, and I’ve got a hydrants layer. You see I’ve also got an inspections table, and we’re going to do hydrant inspections here. Now you can see all of the fields that are here. There’s a whole bunch of them. An important one I just want to probably know is that, in the table that I want to create a relationship for. It is a new field called “inspection ID” and it’s of type grid that’s really important. Because if we want to have the system maintain relationships for us, we need to establish that relationship between a global ID and the primary field ID and a grid, as the foreign key.
JEFF: So inside of my database, I can create a new relationship class. Let’s call it “hydrant inspections.” We just go all day on this. Alright we’re going to go from our feature layer to our destination table. The inspections table. To keep it simple, we’ll call it “inspections to hydrants.” And we have the one-to-many relationship — it is going to do a lot of inspections against those hydrants. Like I was saying, to set up the relationship where the primary key on the hydrants layer is a global ID field, you have to have that global ID field. And the foreign key is not the global ID field in the grid field, so that we can maintain that relationship the global ID from the from the feature layer is to be passed automatically to the table into that grid field. And you chose a global ID field that would create something completely new. And then we can go, and we’ve created the relationship inside of the editor.
JEFF: You can test that relationship really easily by selecting a feature, going to the attributes dialog, trying to add any relationship to it, and see if that’s maintained. I recommend you try to do that before you publish.
JEFF: Now the last thing to mention on this is, inside of ArcGIS Desktop in this catalog window here, I can sign in to ArcGIS Online. So I can use that same kind of username and password, water webinar, if I tap the “Sign In” button it connects to it. You can see the water violations one I already created now, in the shared dialog, share file, share a service. I can publish the hydrant and its related table as a new web layer to the new feature service web layer directly in there. And I can — inside of this dialog — control editing behavior and hit the “publish” button so it’s simple to create those relationship. I’m directly inside of ArcMap for use within Collector.
JEFF: Also just double check to make sure that the hydrant inspection table is in your map before publishing. It all needs to be in there in order to publish it as a feature service. You can use it in Collector.
JEFF: Are we a little bit more than two minutes? My apologies for that.
CHRISTA: No, that was really good. I know we’re out of time I’d like to take maybe five extra minutes and — we usually cut off right at ten — but there were a lot of questions surrounding ArcGIS Online for organizations and Portal for ArcGIS. If you could discuss the differences that affect Collector specifically ,and we’ll go ahead and answer that and try to wrap things up. I know we’re going a little long.
Part XVIII: Question: “What’s the Difference between Using Portal for ArcGIS or ArcGIS Online?”
JEFF: That’s like a 30 minute question right there for me. Right, so the support network I’m serving Collector, you saw when I went to sign on to Collector, I had the option of signing in to the Portal for ArcGIS or signing into ArcGIS Online. What’s really important about the Portal for ArcGIS aspect is, I can manage you the same way that I do with ArcGIS Online. I could use the identity store inside a portal, or I could use my own identity store for it.
JEFF: The important aspect, though, is “How do you access the data that’s behind your firewall? The maps, the services and all that, on your mobile device — when you’re out in the field?” And that’s where you need to work with your IT group to make sure that you either have your web adapter set up outside of your firewall, and you can reverse proxy through it, or VPN from your device in order to gain access. Or you get the device on the Wi-Fi connect, download maps, go to the field, do data collection, then come back in the office when you are connected and sync.
JEFF: So that’s the basics right there. It’s a little more complicated if you’re using Portal for ArcGIS instead of ArcGIS Online. You’re going to have to talk to those IT people.
JEFF: So there’s a great webinar today. And David, you usually have something to say. If you want to jump in here.
Part XVIII: Question: “Do You Need ArcGIS Desktop to use ArcGIS Online and Collector?”
DAVID: Of course. Well I wanted to remind as Christa that with “One Water,” it’s also One Organization,” and is “One IT.” One operations, right? That’s right we are. these one family – yes people okay the one thing I wanted to stress, and again, I get asked all year long at conferences — is that folks will say, “Well can I use Collector without ArcGIS Desktop,” and “Do I need ArcGIS Desktop?” And the answer is yes. You can get started with just ArcGIS Online and Collector and start rolling. As you saw Jeff use a template, those feature and that feature service had all the attributes. It even had valid values. That’s if you’re using one of the ArcGIS utility templates.
DAVID: If you don’t use a template, really ArcGIS Online is kind of this empty canvas that you can start adding data to. But really, the key feature is when you use ArcGIS Desktop is that it will do those domains with the valid ID list. So there’s no typing involved. And it’s to just show, this is really the only way that you can get relationship classes into your Collector. So ArcGIS Desktop is highly encouraged but not required.
DAVID: With ArcGIS Desktop and Collector and ArcGIS Online, you get your domains. You get those relationship classes. But if you don’t have ArcGIS Desktop, you can still get started right away with Collector. Use a template — all of the attributes are there, all those domains, those valid values, are there — and you can get started right away. Because everyone’s said, “Okay the less typing, the better.” So I really encourage having those relationship classes and domain set in ArcGIS Desktop.
DAVID: But yes, this is a whirlwind tour of some of the basics. But Jeff always has those good tips and tricks. And the beauty of this is that it’s recorded all your Q&As. Jeff and I will make sure we get that answered that will be posted to the [Esri Water Meetup]. But I just want to say thanks to all for a good year, and keep the questions coming. We look for more exciting things in Collector in 2017.
DAVID: So Jeff, thank you for having me. Thanks for participating. I know you’re never quite sure what you’re getting into.
JEFF: I’m good with you guys. Thank you.
CHRISTA: Alright well everyone thank you for joining our last water webinar of 2016. In January 2017, we’re going to have a sneak peek for our 2017 Water Conference that’s going to be in Orlando on February 7th through 9th. Registration coming soon for that webinar. Thank you and have a great weekend!
Explore Related Knowledge Base Items

Free Eos Arrow GNSS with Esri ArcGIS Field Maps: Request the Recording
Eos is pleased to offer a free training workshop for those who wish to use Arrow GNSS receivers with Esri’s ArcGIS Field Maps. Request the recording here.

Free High-Accuracy Data Collection with Arrow GNSS and ArcGIS Survey123: Request the Recording
Eos is pleased to offer a free training workshop for professionals interested in using Esri’s ArcGIS Survey123 application with Arrow GNSS receivers.