The initial setup for your Arrow Series® GNSS receiver will take you through 3 main steps:
- Inventory & Power Up
- Bluetooth® Pairing & App Setup
- Mounting & Antenna Setup
Inventory & Power Up (Step 1 of 3)
A. Inventory Necessary Items
This requires the following components:
- Arrow Series® receiver
- Antenna
- Antenna connection cable (2 sections)
- Device mount
- Your device (iOS®, Android, or Windows)
- GNSS connection software (Eos Tools Pro for iOS/Android, drivers for Windows)
B. Power Up the Arrow Unit
The attached battery pack ships already charged. The Arrow power button is located in the upper right, on the face of the device (side with the archer illustration).
This guide is focused on the minimum requirements to get your Arrow unit up and running. For a more optimal understanding of your Arrow, we encourage you to familiarize yourself with your Arrow GNSS receiver’s connections, indicator lights, and battery pack. Additionally, we also encourage you to review the complete Arrow User Manual.
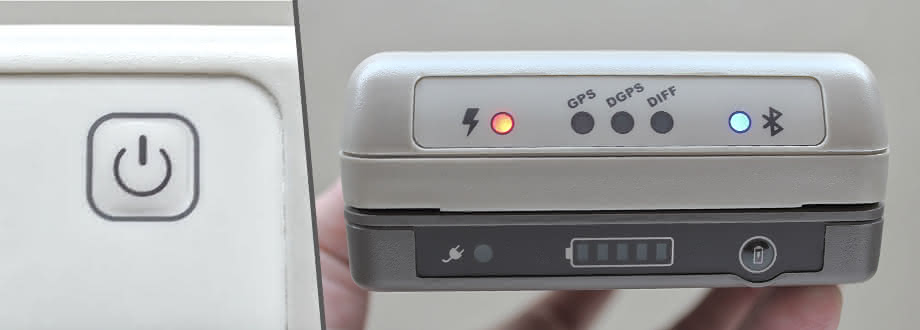
Give the power button a deep press to activate it – the button surface is raised, but the mechanism is deeper inside. (This helps prevent accidental activation in storage or transit)
After activation, the lights will flash on. The red power light will remain lit, and the blue Bluetooth® light will flash, indicating it’s ready to pair.
NEXT: Bluetooth® Pairing
Choose what you are pairing with:
Pair Bluetooth with iOS (Step 2 of 3)
A. Pair the Arrow With iOS via Bluetooth
Your Arrow unit works with the native Bluetooth capabilities of your iOS device. Nothing additional is needed.
You need to access your Bluetooth settings.
Begin by opening Settings, then tap Bluetooth. Make sure it is turned on.
iOS will now scan, and show the Arrow unit under Other Devices. Tap the available Arrow device, and it will pair.
B. Install & Run Eos Tools Pro
Visit our Eos Tools Pro page and click the iOS install link.
Once installed, start the app. Grant the permissions it asks for at startup.
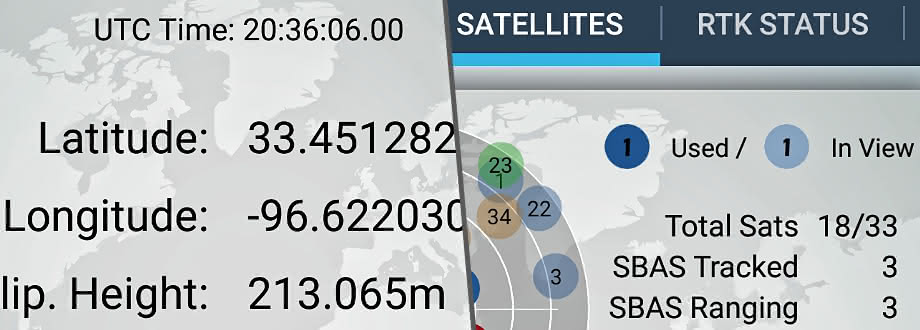
NEXT: Completing the Hardware Setup
The Arrow unit is now paired with iOS, and the app is accessing it.
The Eos Tools Pro app is expecting to receive data, but the antenna needs to be attached first.
Choose which mounting option you are using:
Pair Bluetooth with Android (Step 2 of 3)
A. Pair the Arrow With Android via Bluetooth
Your Arrow unit works with the native Bluetooth capabilities of your Android device. Nothing additional is needed.
You need to access your Bluetooth settings.
- On some phones, access them directly by swiping down from the top, and tapping the Bluetooth icon to turn it on (or off, then on if needed).
- Or, go into Settings, and tap Connections. Make sure Bluetooth is on, and click the word Bluetooth.
Android will now scan, and show the Arrow unit under Available Devices. Tap the available Arrow device, and tap OK to the pairing request. Now tap Done.
B. Install & Run Eos Tools Pro
Visit our Eos Tools Pro page and click the Android install link.
Once installed, start the app. Grant the permissions it asks for at startup.
Next, you will need to set Eos Tools Pro as the Mock Location app on your Android device. This is a required step before continuing. See how to enable Eos Tools Pro as the mock location in Android.
Once Eos Tools Pro is set as the Mock Location app in the Android Developer options (from the article above), you will need to restart the Eos Tools Pro application.
Next go to the Menu (3 dots in upper right) and tap Enable Mock Location and then Start GPS. It will then ask you to select a device to connect. Tap the Arrow device.

NEXT: Completing the Hardware Setup
The Arrow unit is now paired with Android, and the app is accessing it.
The Eos Tools Pro app is expecting to receive data, but the antenna needs to be attached first.
Choose which mounting option you are using:
Pair Bluetooth with Windows (Step 2 of 3)
A. Pair the Arrow With Windows via Bluetooth
The basic steps to pair to Windows 11 are the same and you should be able to follow this guide to get set up, but if not please contact our technical support team.
Your Arrow unit works with Secure Simple Pairing in Windows 10, and should not need a passkey. If for some reason, Windows does ask for a passkey, you can use 12345678.
On the Windows taskbar, click Show hidden icons and then click the Bluetooth icon. In the flyout menu, choose Add a Device.
(If there is no Bluetooth icon, your Bluetooth connection is probably turned off. Turn it on at Settings > Devices > Bluetooth. This will take you to the same screen as clicking Add a Device.)
On the Bluetooth Device screen, click Add Bluetooth or other device, then select Bluetooth in the next dialog box. Windows will scan, and you must click the Arrow unit on the list.
Windows will let you know the device is now paired.
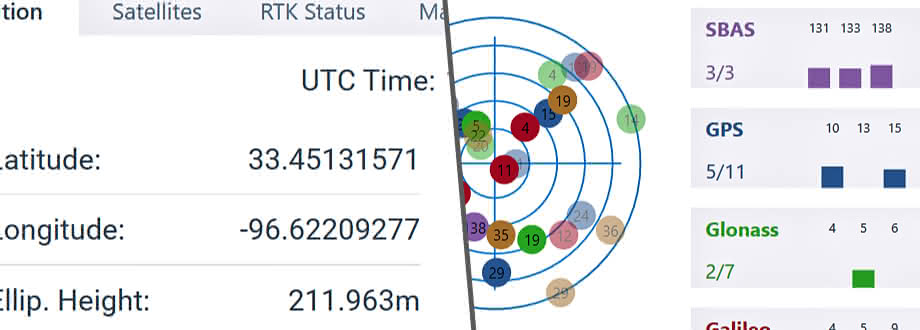
B. Install & Run Eos Tools Pro
Visit our Eos Tools Pro page and click the Windows 10 install link.
Once installed, start the application. Click the Settings icon in the upper right, and then Select Receiver. Choose your paired Arrow unit.
Now click Start GNSS next to Settings.
Click the Settings icon in the upper right, and then enable Replace Device Location.
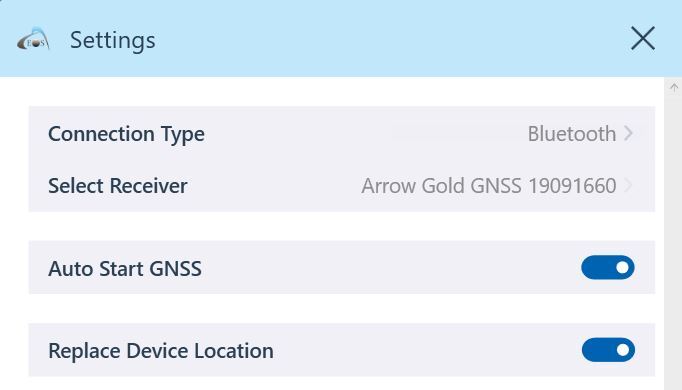
NEXT: Completing the Hardware Setup
The Arrow unit is now paired with Windows 10, and the application is accessing it.
The Eos Tools Pro application is expecting to receive data, but the antenna needs to be attached first.
Choose which mounting option you are using:
Mount Arrow with a Range Pole (Step 3 of 3)
Your Arrow, paired device, and application are all set up. To complete the setup:
- Mount Arrow in the receiver bracket
- Attach receiver bracket to range pole clamp
- Assemble the range pole
- Secure clamp on range pole
- Assemble and mount antenna/plate
- Connect Arrow & antenna
A. Mount Arrow in the Receiver Bracket
Grasp the receiver bracket, and make sure that the two small securing screws are backed out as far as they can go, while still being connected to the bracket. Hold the bracket facing you in once hand, with the curved clip designed to grasp the end of the receiver at the top.
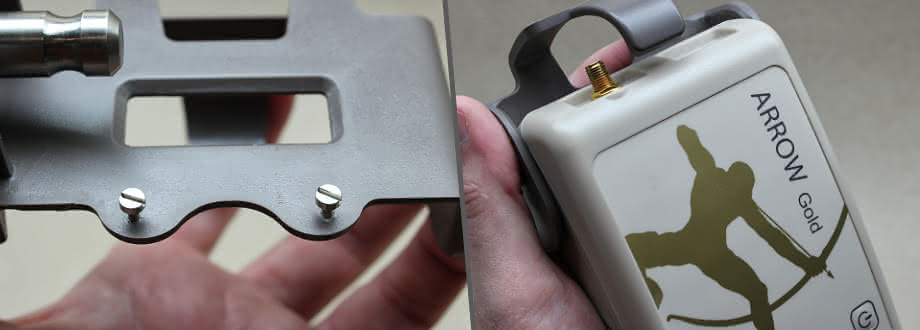
Place the Arrow unit into the bracket, with the face toward you, and the end with the gold screw connector (antenna connector) sliding under the clip. When the Arrow is fully inserted, it should click into the bracket.
Next, flip the bracket over so that you can see the small mounting screws. Tighten the screws until snug.
B. Attach Receiver Bracket to Range Pole Clamp
Still holding the Arrow and bracket, pick up the range pole clamp, with the knurled knob facing you. Orient the clamp so that the end with the mounting peg hole is matched to the silver mounting peg.
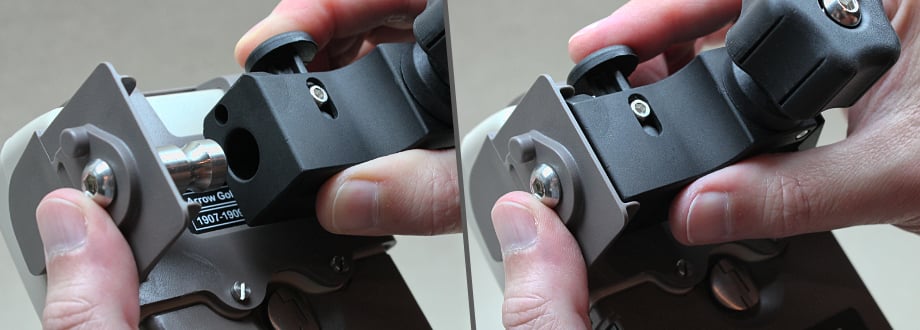
Using a finger, press the large button next to the mounting peg hole, enabling it to receive the mounting peg. Finally, insert the bracket’s silver mounting peg fully into the clamp’s hole, and release the button to secure.
Your Arrow and mounting assembly are now ready for attaching to the range pole.
C. Assemble the Range Pole
Screw together the bungee-connected range pole sections. Make sure the pointy foot attachment is screwed onto the threaded end opposite the section with the Eos logo.
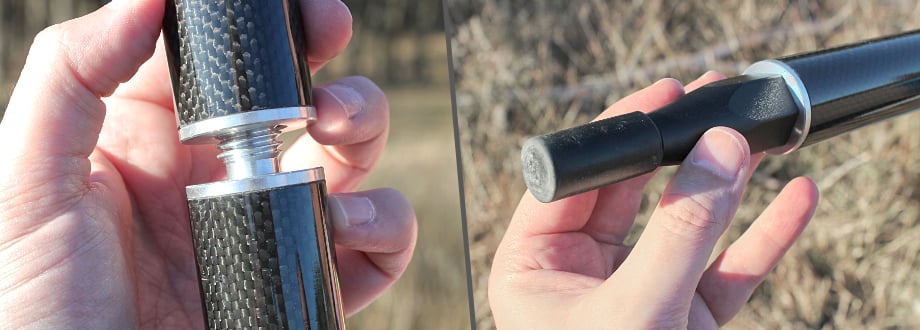
While standing, hold the range pole upright in front of you, with the foot securely on the ground.
D. Secure Clamp on Range Pole
Holding the range pole with one hand, slip the Arrow’s clamp down over the top of the pole. The threaded antenna mount end of the Arrow should be oriented toward the top of the pole.
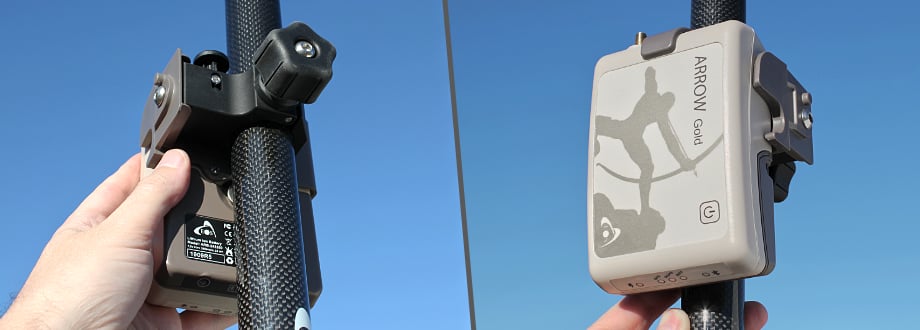
Taking the hand from the range pole, tighten the knurled knob to snug the clamp so that the top of the Arrow unit is about 15 cm from the top of the pole.
E. Assemble and Mount Antenna/Plate
Take the antenna in your hand, mounting holes facing you, and the gold screw connector pointing toward your body. With the other hand, grasp the antenna plate similarly, with the flat side facing you, and the elongated end toward your body. Now bring the plate over, laying the flat face onto the antenna, looking to line up the holes on both items. With the hand holding the antenna, grasp the plate as well, to snug them together.
Using the 4 provided mounting screws, line up plate and antenna, and secure the screws so plate and antenna are snug.
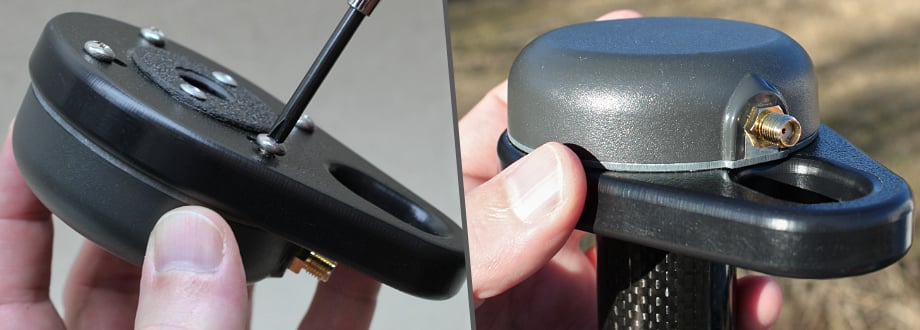
Flip the antenna assembly over, and bring the central screw hole down onto the threaded top of the range pole, screwing the two together.
At this point, you may want to readjust the orientation of the Arrow unit so that the gold screw connector is more in line with the matching connector on the antenna.
F. Connect Arrow & Antenna
Note the connectors on the ends of the two sections of antenna connection cable:
- Right-angle connectors for attaching to Arrow unit & antenna
- BNC connectors for connecting the two cable sections
Take the BNC (no right-angle) connectors in each hand, and note the small metal pins on either side of one, which match the slots on the other. Slip one into the other and screw down until it secures with a click.
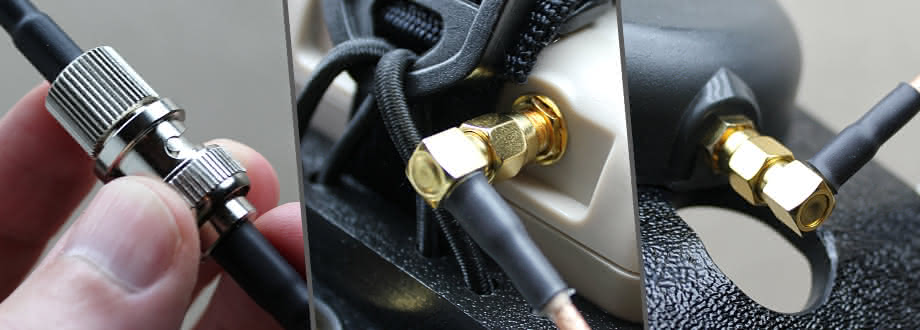
Now slip one of the right angle connectors up next to the elongated end of the antenna plate, and screw it onto the antenna connector. Take the other right angle connector, and screw it onto the gold connector on the end of the Arrow unit.
The Arrow can now connect with the satellites, and you should now see submeter location data coming into your Eos Tools Pro app once you bring it back up.
IN ORDER TO COLLECT DATA, YOU MUST USE AND CONNECT WITH THIRD PARTY DATA COLLECTION SOFTWARE:
Install Data Collection Application
In almost all cases, Eos customers will also install a third-party application to handle field workflows, such as data collection or inspections. Eos partners with a variety of industry-leading companies (e.g., Esri) to recommend software products that already integrate with Arrow GNSS receivers and their location metadata. Explore our partner directory for apps we recommend. In addition, if you have a proprietary application and you would like it to be compatible with Arrow GNSS, simply contact our team for next steps.
Having trouble? Contact Technical Support >
Mount Arrow with a Hand Bracket (Step 3 of 3)
Your Arrow, paired device, and application are all set up. To complete the setup:
- Mount Arrow in the handheld bracket
- Connect Arrow & antenna
- Mount your device
A. Mount Arrow in the Handheld Bracket
Place your handheld bracket on a stable surface, and unfasten the hand strap by drawing back the velcro until it disconnects. Pull the inner portion of the hand strap out, to create a gap between it and the mounting strap underneath it.
Reach under the hand strap and unfasten the mounting strap by drawing back the velcro until it disconnects. Pull the inner portion of the mounting strap out so that you now have room to slip the Arrow unit underneath.
Place the Arrow unit into the mount under the straps, with the gold screw connector (antenna mount) toward the end where the antenna is. Once the Arrow is in place, cinch down and refasten the velcro end of the mounting strap snugly. The Arrow should be secure.
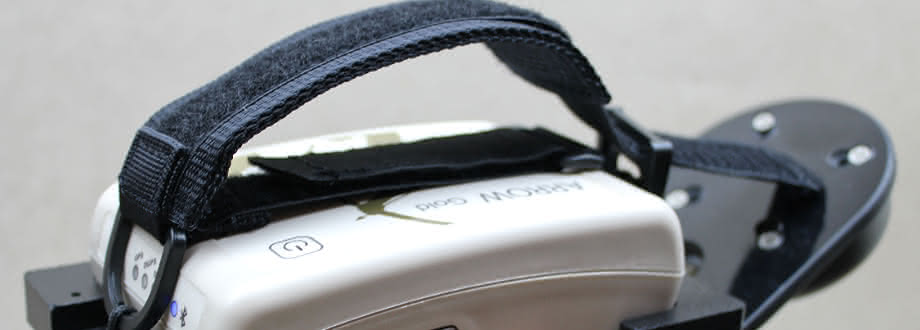
Next, flip the bracket over so that the antenna side is facing you. Grasp the bracket + Arrow with your hand, slipping your fingers under the hand strap, and cinch down and refasten the velcro end of the hand strap with your other hand.
Holding the bracket in this way points the directional antenna skyward, which is necessary to connect with the satellites. Note that you must also be outside to properly connect.
B. Connect Arrow & Antenna
Note the connectors on the ends of the two sections of antenna connection cable:
- Right-angle connectors for attaching to Arrow unit & antenna
- BNC connectors for connecting the two cable sections
Take the BNC (no right-angle) connectors in each hand, and note the small metal pins on either side of one, which match the slots on the other. Slip one into the other and screw down until it secures with a click.
Now take one of the right angle connectors, and screw it onto the gold connector on the end of the Arrow unit. Attach the other end to the similar connector on the antenna.

The Arrow can now connect with the satellites, and you should now see submeter location data coming into your Eos Tools Pro app once you bring it back up.
C. Mount Your Device
Holding the entire assembly securely, insert your mobile device into the spring-loaded mount on the side now facing you. Push back on the top portion to expand, slip the device in, and let the spring action snug it into place.
This completes the initial steps of making sure that all of the foundational elements are in place, and the Arrow is delivering real-time data to your application.
IN ORDER TO COLLECT DATA, YOU MUST USE AND CONNECT WITH THIRD PARTY DATA COLLECTION SOFTWARE:
Install Data Collection Application
In almost all cases, Eos customers will also install a third-party application to handle field workflows, such as data collection or inspections. Eos partners with a variety of industry-leading companies (e.g., Esri) to recommend software products that already integrate with Arrow GNSS receivers and their location metadata. Explore our partner directory for apps we recommend. In addition, if you have a proprietary application and you would like it to be compatible with Arrow GNSS, simply contact our team for next steps.
Having trouble? Contact Technical Support >
Mount Arrow with a Vest Pole (Step 3 of 3)
Your Arrow, paired device, and application are all set up. To complete the setup:
- Extend pole and mount on vest
- Assemble and mount antenna/plate
- Connect Arrow to antenna cable
A. Extend Pole and Mount on Vest
Looking at the 3-section pole from the top (small) end, turn each section counter-clockwise to unlock, pull out to full extension, then turn clockwise to lock into place.
Place the vest on a flat surface with the back facing up. Slip the extended pole, largest section downward, into the narrow pocket on the left side.
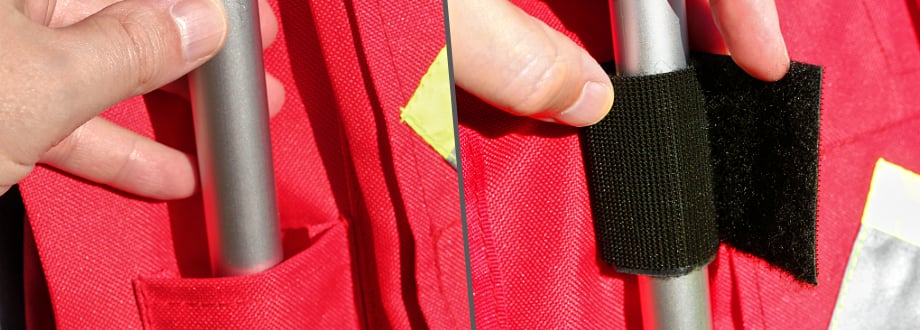
Open up both sides of the velcro fastener straps. Allow the pole to lay across the metal plate, and bring one of the strap ends around and snug it across the pole, attaching the velcro. Bring the remaining side of the velcro strap around, and secure it in the same way.
B. Assemble and Mount Antenna/Plate
Take the antenna in your hand, the side with the mounting holes facing you, and the gold screw connector pointing toward your body. With the other hand, grasp the antenna plate similarly, with the flat side facing you, and the elongated end toward your body. Now bring the plate over, laying the flat face onto the mounting hole side of the antenna, looking to line up the holes on both items. With the hand holding the antenna, grasp the plate as well, to snug them together.
Using the 4 provided mounting screws, line up plate and antenna, and secure the screws so plate and antenna are snug.

Flip the antenna assembly over, and bring the central screw hole down onto the threaded top of the pole. Screw the two together.
C. Connect Arrow & Antenna
If you are using the 1-piece cable, screw one end to the the antenna connector, and the other to the Arrow unit. Slip the Arrow unit into your belt pouch or accessible pocket.
If you are using the 2-piece cable with the BNC connectors:
Note the connectors on the ends of the two sections of antenna connection cable:
- Right-angle connectors for attaching to Arrow unit & antenna
- BNC connectors for connecting the two cable sections
Take the BNC (no right-angle) connectors in each hand, and note the small metal pins on either side of one, which match the slots on the other. Slip one into the other and screw down until it secures with a click.
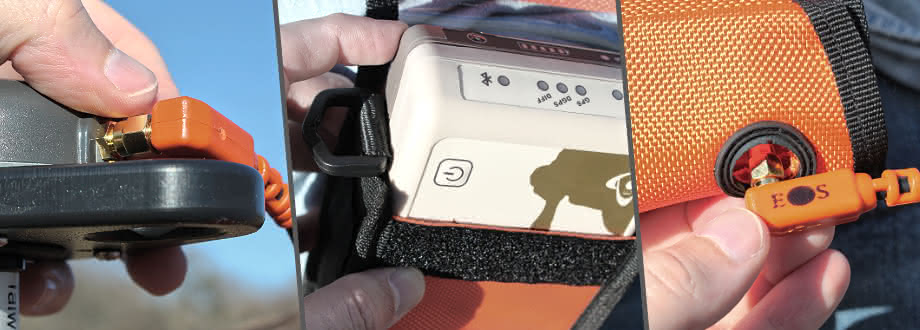
Slip the Arrow unit into your belt pouch or accessible pocket. Finally, attach the remaining end of the antenna cable to the Arrow unit.
The Arrow can now connect with the satellites, and you should now see submeter location data coming into your Eos Tools Pro app once you bring it back up.
IN ORDER TO COLLECT DATA, YOU MUST USE AND CONNECT WITH THIRD PARTY DATA COLLECTION SOFTWARE: Browse partner apps we recommend.
Install Data Collection Application
In almost all cases, Eos customers will also install a third-party application to handle field workflows, such as data collection or inspections. Eos partners with a variety of industry-leading companies (e.g., Esri) to recommend software products that already integrate with Arrow GNSS receivers and their location metadata. Explore our partner directory for apps we recommend. In addition, if you have a proprietary application and you would like it to be compatible with Arrow GNSS, simply contact our team for next steps.
Having trouble? Contact Technical Support >
Mount Arrow with an Antenna Hat (Step 3 of 3)
Your Arrow, paired device, and application are all set up. To complete the setup:
- Insert antenna in hat pocket
- Connect antenna to cable
- Connect Arrow to antenna cable
A. Insert Antenna in Hat Pocket
Place the hat on a level surface, and open the velcro-secured flap. With the flat side that has the mounting holes facing down, slide the antenna into the open pocket. Close the flap over the pocket such that the gold screw connector pokes through the hole. Pull the flap snugly, and secure the velcro.
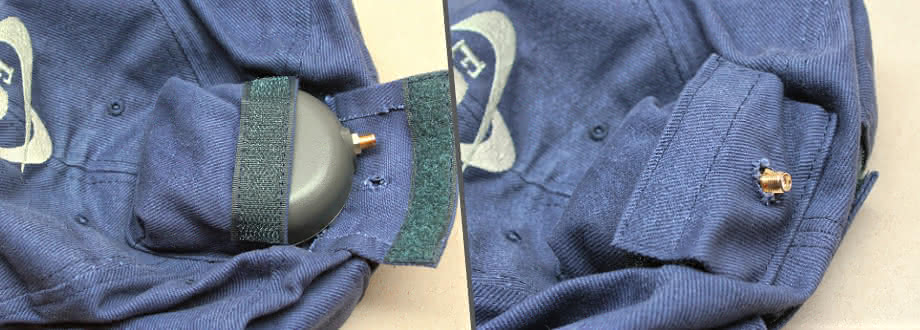
B. Connect Antenna to Cable
Screw the open end of the antenna cable onto the protruding gold screw connector. Adjust the hat sizing strap and hat position so that the hat is both comfortable and secure.
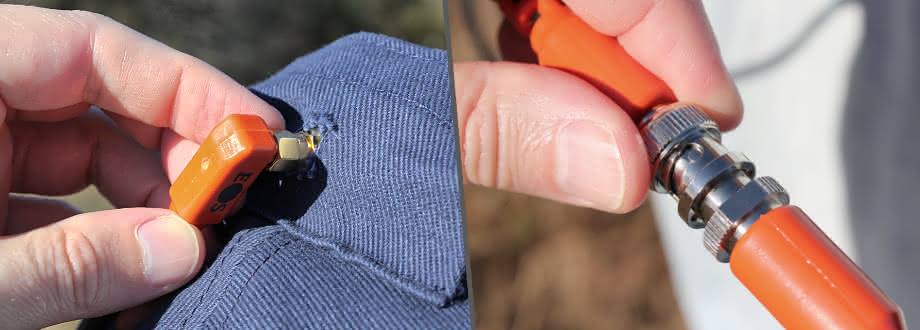
If you are using the 1-piece cable, this step is complete. If you are using the 2-piece cable with the BNC connectors:
Note the connectors on the ends of the two sections of antenna connection cable:
- Right-angle connectors for attaching to Arrow unit & antenna
- BNC connectors for connecting the two cable sections
Take the BNC (no right-angle) connectors in each hand, and note the small metal pins on either side of one, which match the slots on the other. Slip one into the other and screw down until it secures with a click.
C. Connect Arrow to Antenna Cable
Slip the Arrow unit into your belt pouch or accessible pocket. Finally, attach the remaining end of the antenna cable to the Arrow unit.
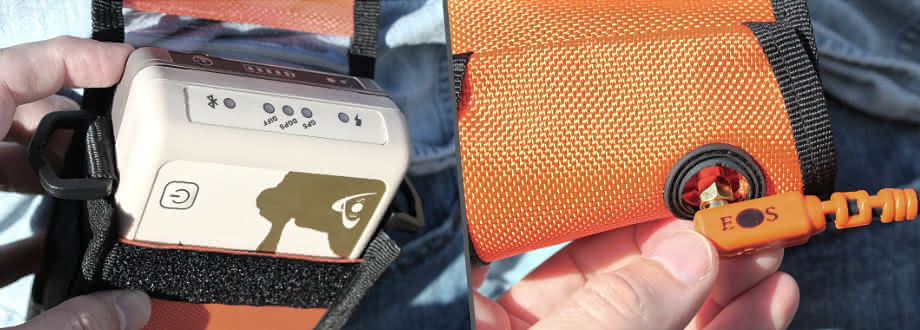
The Arrow can now connect with the satellites, and you should now see submeter location data coming into your Eos Tools Pro app once you bring it back up.
IN ORDER TO COLLECT DATA, YOU MUST USE AND CONNECT WITH THIRD PARTY DATA COLLECTION SOFTWARE:
Install Data Collection Application
In almost all cases, Eos customers will also install a third-party application to handle field workflows, such as data collection or inspections. Eos partners with a variety of industry-leading companies (e.g., Esri) to recommend software products that already integrate with Arrow GNSS receivers and their location metadata. Explore our partner directory for apps we recommend. In addition, if you have a proprietary application and you would like it to be compatible with Arrow GNSS, simply contact our team for next steps.
Having trouble? Contact Technical Support >


