Eos Tools Pro for Android | An Overview
Synopsis
Eos Tools Pro is the free Android app that helps you monitor high-accuracy location in the field. Designed by Eos Positioning Systems, Inc.® (Eos), Eos Tools Pro lets you see your DOP, RMS values, PDOP, Differential Status, Satellites Tracked and Used, and more — in real time.

Transcript
This video will show you how to use your Android device to connect to your Eos Arrow Series® receiver. And specifically we’re going to examine the use of RTK corrections via an RTK network through cell service. And this is something that you can use with your Arrow 200 RTK receiver or your Arrow Gold RTK receiver, for centimeter level accuracy.
Initially, the very first time that you use your Android device you will have to go into settings, and if we scroll down here you can see this developer options. You’ll have to go into developer options and enable the mock location services. And on our website, here, we have an example of the steps to get that going.
I’ve already initialized it on this particular Android, so I can’t go through the steps again. But like I said, we do have a description, [and] it’s only a couple steps. Once the mock location service is enabled on your Android device, it will always be enabled — and you won’t have to do this again.
So, first, what we’re going to do is we’re going to come to our connections here, and we’re going to go to Bluetooth®. And what you can do is tell it to scan and look for any Bluetooth® devices nearby, and obviously we’re looking for our Arrow Gold, which is what we’re going to demo today.
It would pop up here in “available devices.” You click it and move it up here to “paired devices.” Once this paired device is here we can now go back to our home page, and we can look up the Eos Tools Pro application. This is our interface application for the Arrow receivers, and it can be downloaded from the Google Play Store.
So let’s go into Eos Tools Pro, and up in here is where we have some settings. So initially what we need to do is come in here, and what we’re going to want to do is click the “enable mock location services.” And now we can see that that’s checked.
Then what we want to do is select a GPS device. And because we did the Bluetooth® settings and the Android devices settings itself, it pops up here. We click on our Arrow Gold, and then come in here and we click start GPS.
And now you can see that our data is being populated from the Arrow receiver, so we have latitude and longitude, and then ellipsoid height (this is height above ellipsoid, this is not mean sea level). We have SMA and horizontal accuracy here in meters, and estimated vertical accuracy. And here you can tell this is the DIF status, so right now [it] just says “DGPS” for differential GPS, which means we’re just receiving the submeter corrections every seven seconds from the SBAS satellites (or over North America the WAAS satellites).
However, we’re going to engage our RTK feed and watch this go to float and then to fix, and our accuracy will come down tighter. What I would like to do is click over here real quick to the satellites page, and here we can see that with the SBAS corrections, we’re tracking nine GPS, six GLONASS, three Galileo, and one BeiDou, and two of the SBAS satellites [con]currently.
And then there’s also the map view here, and you can see this is the Eos receiver information here, and we cannot record data with this particular portion here. I just center it on myself here, and it’s just an extra page here in the Eos Tools Pro.
Let’s come back to position. The other thing that I would like to take a look at real quick here is settings. In settings, we can choose between meters or feet. I like to view my stuff in meters. And then for our altitude — our elevation — we have two choices. We have ellipsoidal, or we have the receivers mean sea level. What this means is the receiver has a rough geoid already inside it, so you can switch to receiver mean sea level. But if you really need very accurate elevations, we recommend you leave it on ellipsoidal, collect your data is height above ellipsoid, and then — back on your desktop with your data — apply the geoid 12a or 12b (depending on your location) to get much more accurate mean sea level conversion.
You can also set your antenna height inside Eos Tools Pro (if your particular data collection app does not allow you to enter an antenna height, you can do it here). However, if you’re using Esri Collector [for ArcGIS] we recommend that you enter the antenna height in Esri Collector and leave it “0” here in Eos Tools Pro. It’s very important that you don’t enter a number value for the antenna height in both applications. You want to do it in one or the other.
And then there’s also this new function here that is “auto-launched Collector.“ So that once everything’s set up, and you go to work, day after day, what you can do is power everything on opening Eos Tools Pro — and it will automatically launch you into your Collector app.
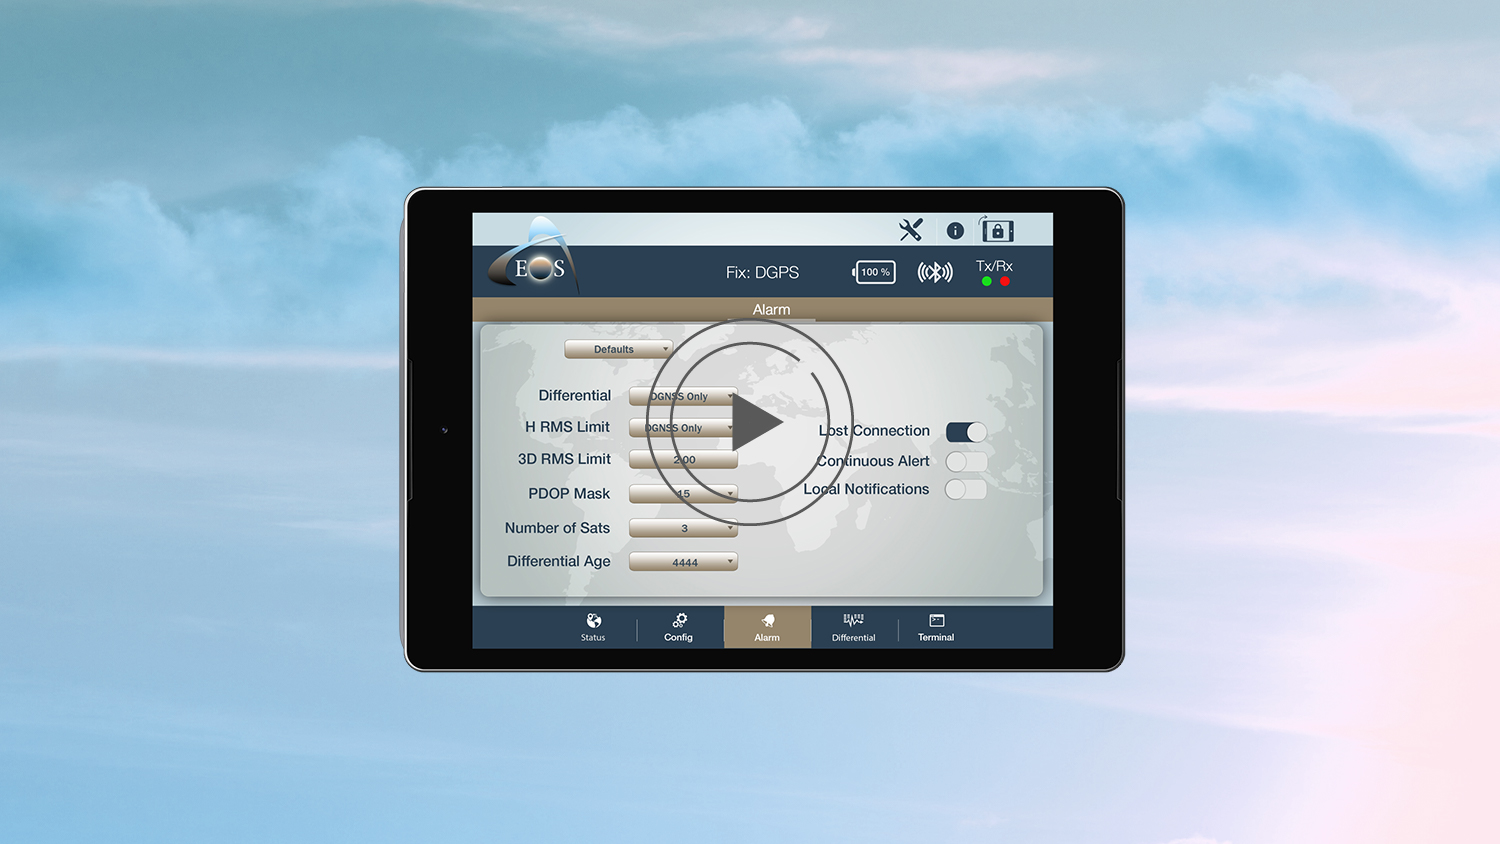
The other information we have down here is we have the alarm, which we’ve discussed in previous videos. But again we can come in here and we can choose a default setting, such as RTK, and that’s going to tell Eos Tools Pro to sound [an] alarm at us if we lose our RTK fix and we go to float, or if our estimated horizontal accuracy goes above three centimeters, and if our diff age counts up.
But I’m going to just return this back to all off, and then if you want to actually come in here and you can just manually choose the numbers that you want to see. And then you can also leave some of them off, or we can just turn them all off.
And then there’s also some options over here like lost connection. If the Bluetooth® connection between your receiver and your Android device is lost, it’ll beep an alarm at you. This is actually a pretty good one to turn on because the Bluetooth® connection — if that gets lost, we really want to know immediately so that we’re not collecting data that is not accurate and not using the Arrow [Series]™ receiver’s information.
Now for RTK work, we’re coming here, and this is where you’re going to put your information for your Ntrip caster from the RTK network that you connect to. So your device, your Android device, needs cell service and you need your information from your local network. And that’s going to consist of an IP address that you’re going to connect to; this is where the centimeter corrections are coming through the internet. This is the port on the computer that we’re going to be connecting to, and you’ll have a username and a password. And then the other thing you need to do is to select a mount point.
I’ve already selected the mount point that I want to use for my location: it is my local network here. And then we want to click “start,” and let’s go back.
Now we can see our green light is blinking, that means that we’re receiving corrections via the RTK network. And you can see we went very quickly to “float” and then “fixed.” And with our corrections coming in from our local network, we’re getting an estimated accuracy of about a centimeter. Remember this is in meters so we can see we’re about at a centimeter there for horizontal, and vertical is about two. And keep in mind with all satellite technology, the vertical accuracy is usually going to be two to three times less accurate than your horizontal, so that’s something to keep in mind. And that’s just because it’s more difficult for satellites to triangulate your vertical — or your Z — position than it is for it to triangulate your horizontal — or your X and your Y — position.
So, this is basically how you get in and get everything going for your RTK fix and now you’re ready to go into your data collection app and start collecting data.
[Music]
Explore Related Knowledge Base Items

How Do I Calculate The Total Antenna Height (Including Antenna Phase Center) for RTK Applications?
This article will show you how to calculate your total antenna height, including phase center, mounting plate height, and range pole, for use with RTK elevations.

Eos Laser Mapping™ Guide: Step-by-Step Startup (PDF)
This Eos Laser Mapping™ for ArcGIS® User Manual is a resource for those interested in deploying laser mapping.